For the First Time in Four-Ever

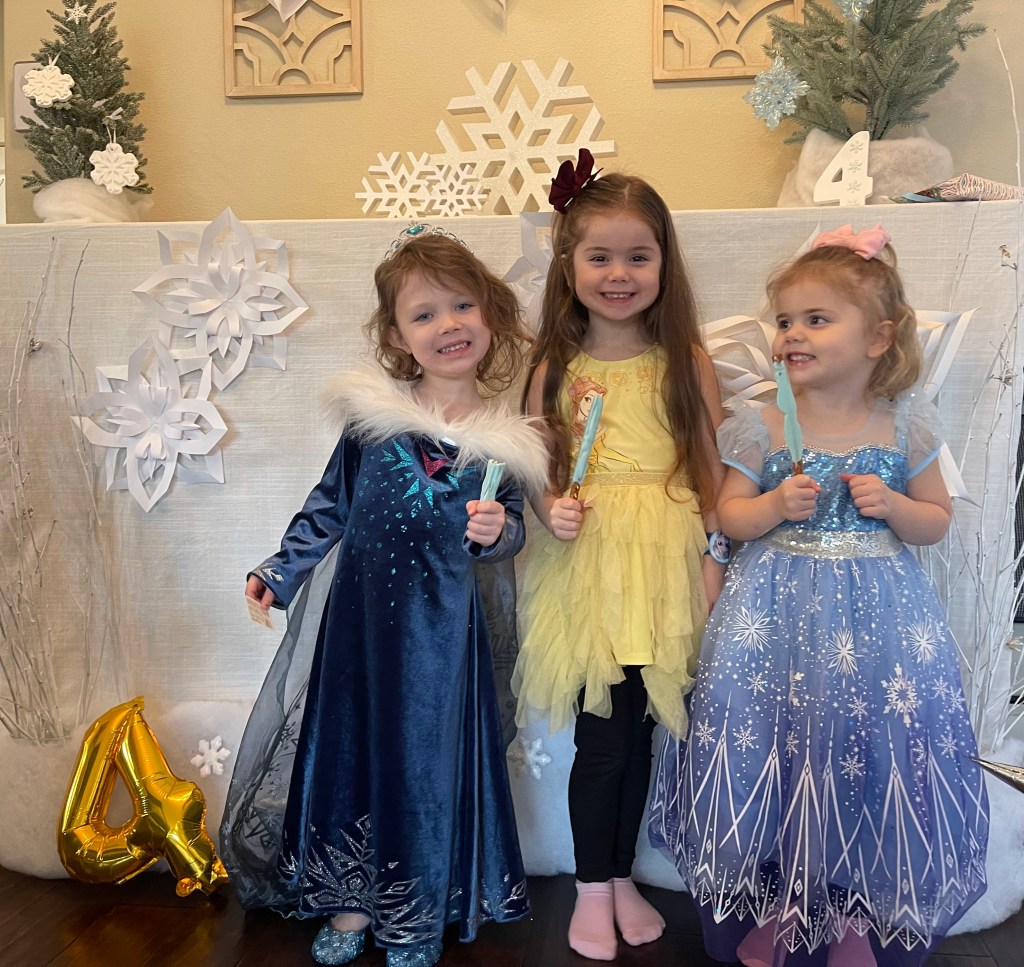
Our daughter requested an “Elsa” Birthday party this year and I was SO excited to plan and execute it for her! I immediately pictured a Winter Wonderland and began planning a few months ahead of time. I was thinking of the scene in Elf when he spent the night decorating the department store with paper snowflakes, EVERYWHERE!

Our little “Elsa”

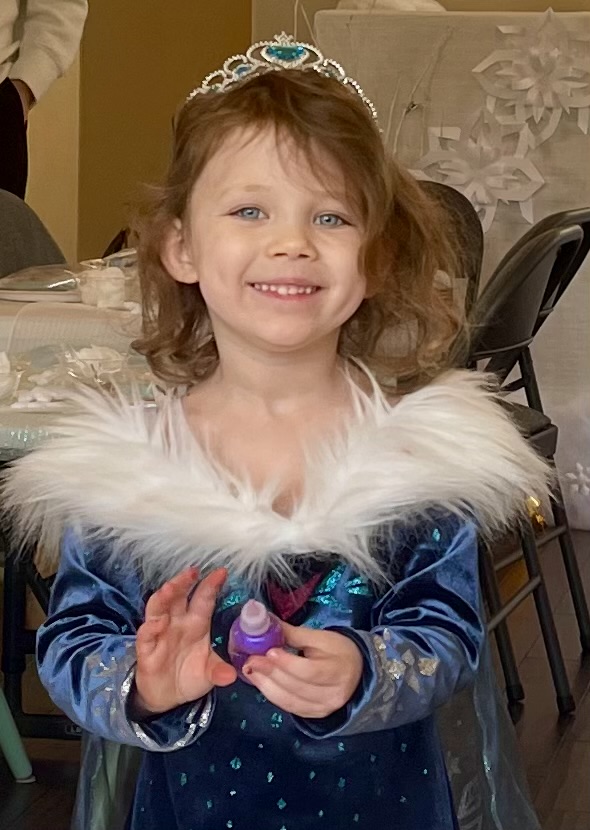
The Elsa dress and shoes my daughter wore can be found on Amazon.

Decor

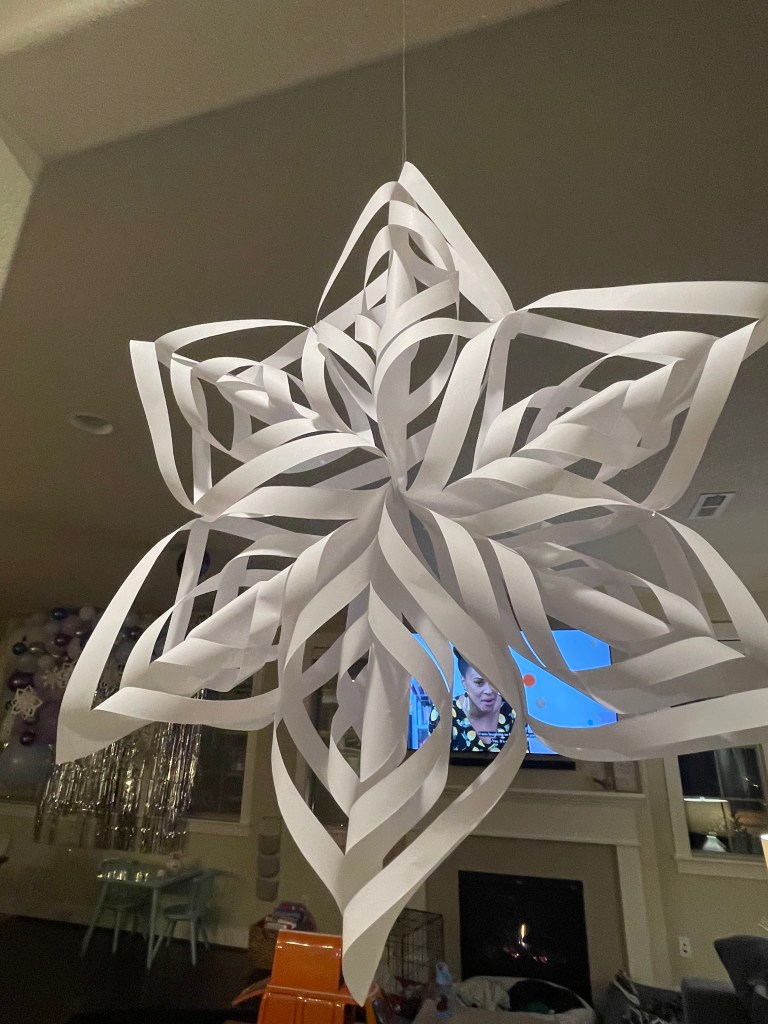
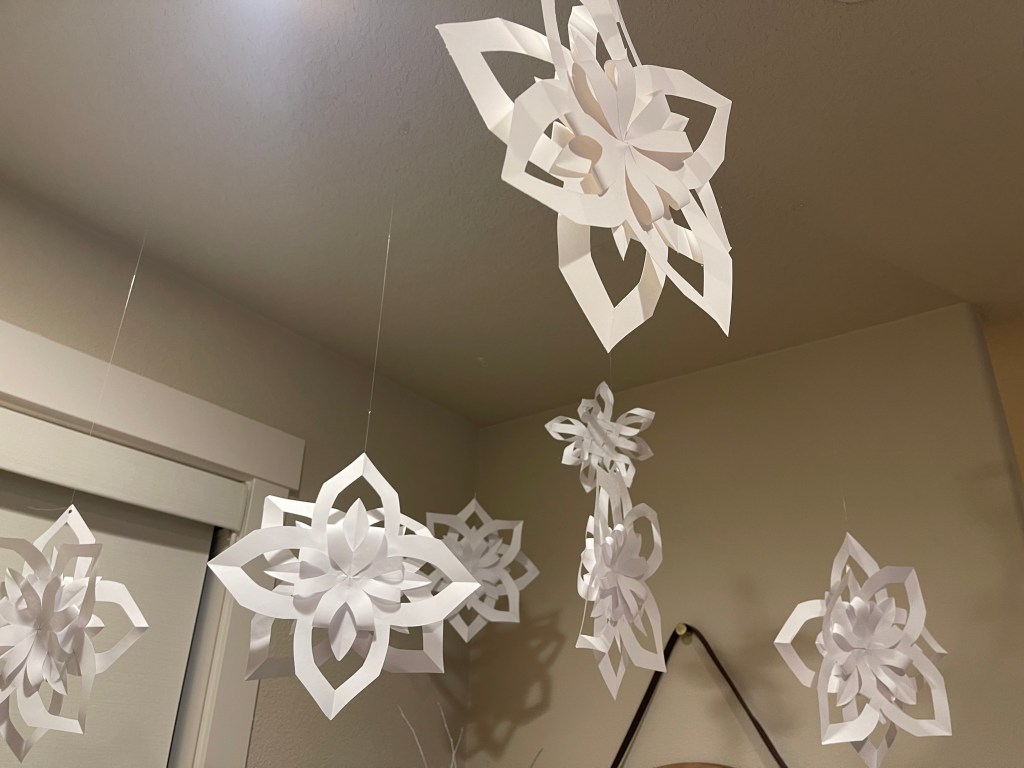
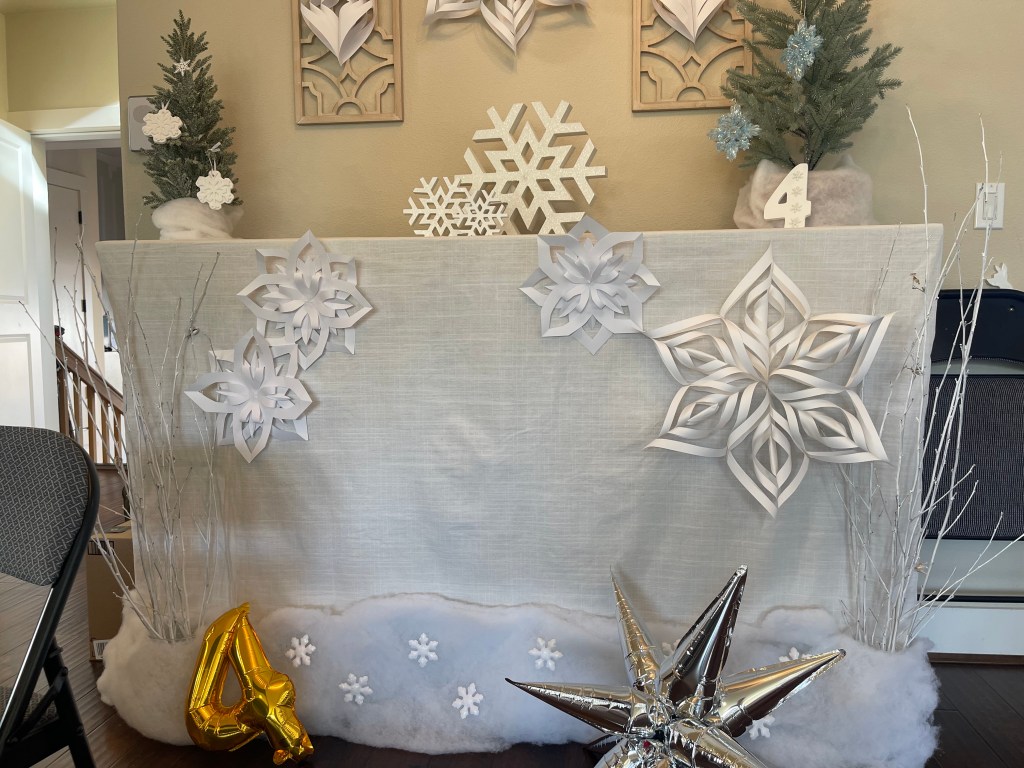
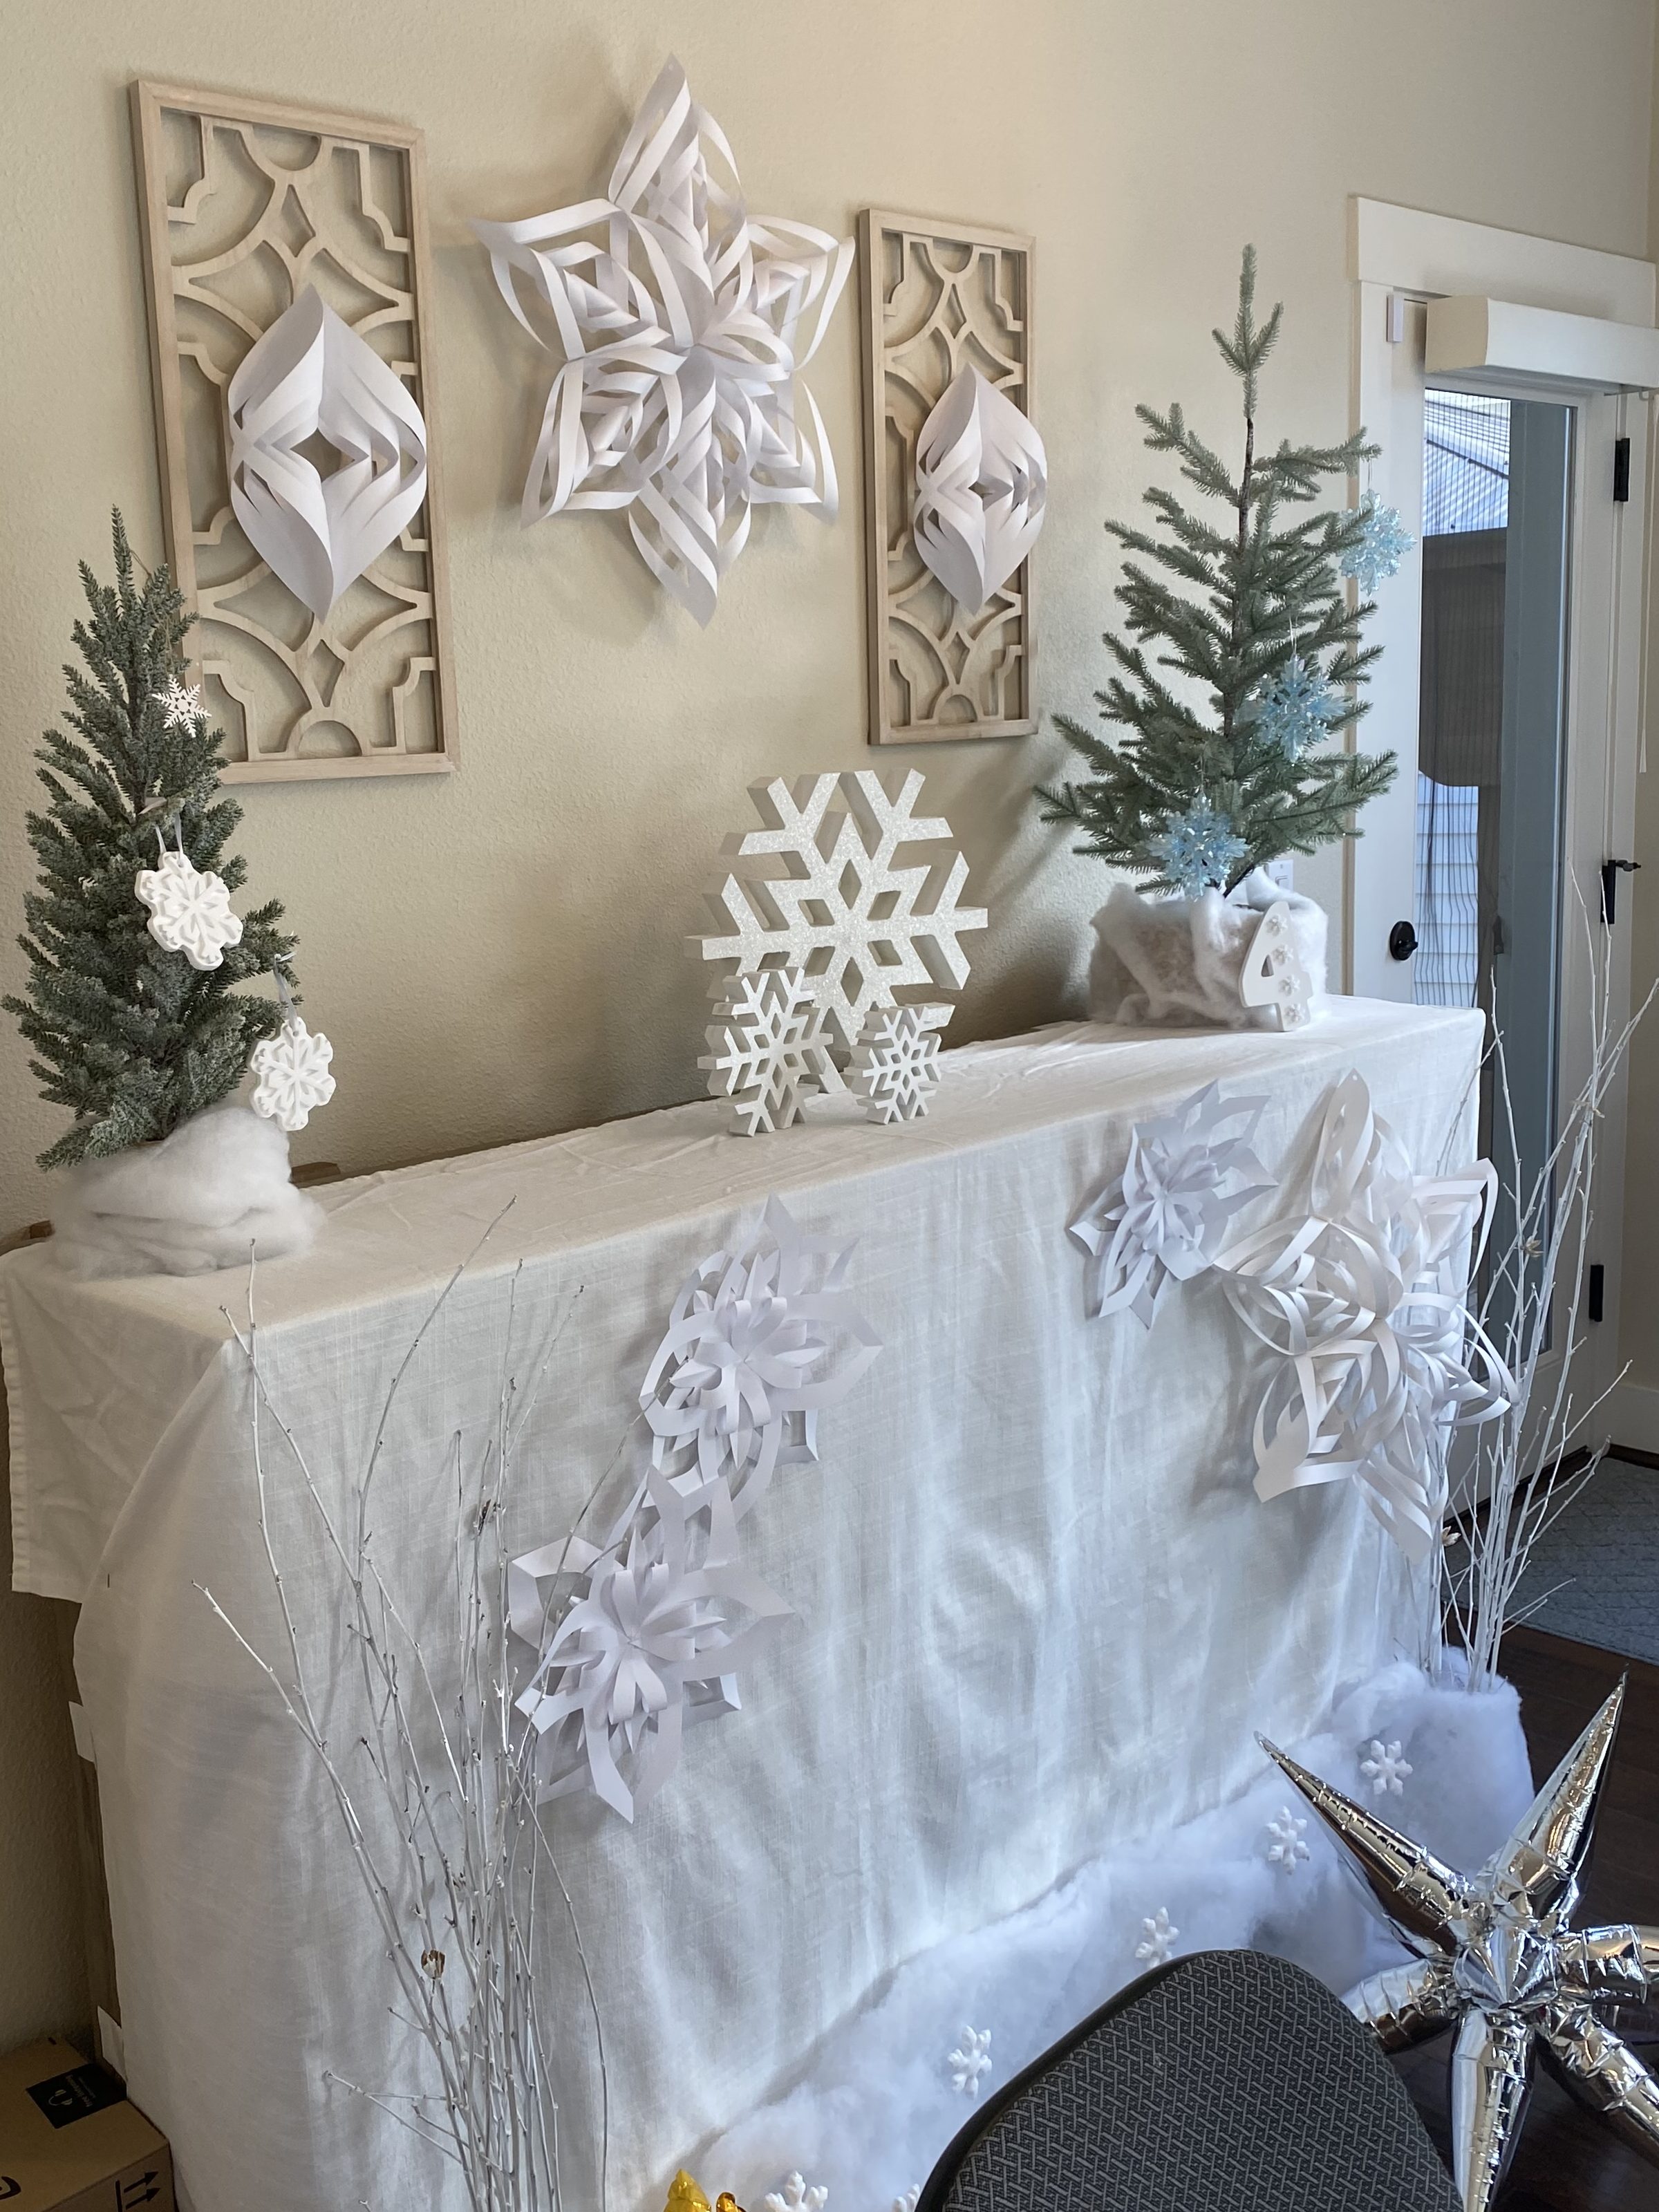
I started making the paper snowflakes before Christmas and slowly started hanging them on the ceiling at our front door, it was a bonus Christmas decoration! I made a few different snowflakes to give a different dimension to the decor. Here is the one that took 2 pieces of paper and this is the large one that took 6 pieces of paper each. I used tape for the small snowflakes and mini Command hooks for the larger snowflakes and hung them on the ceiling.

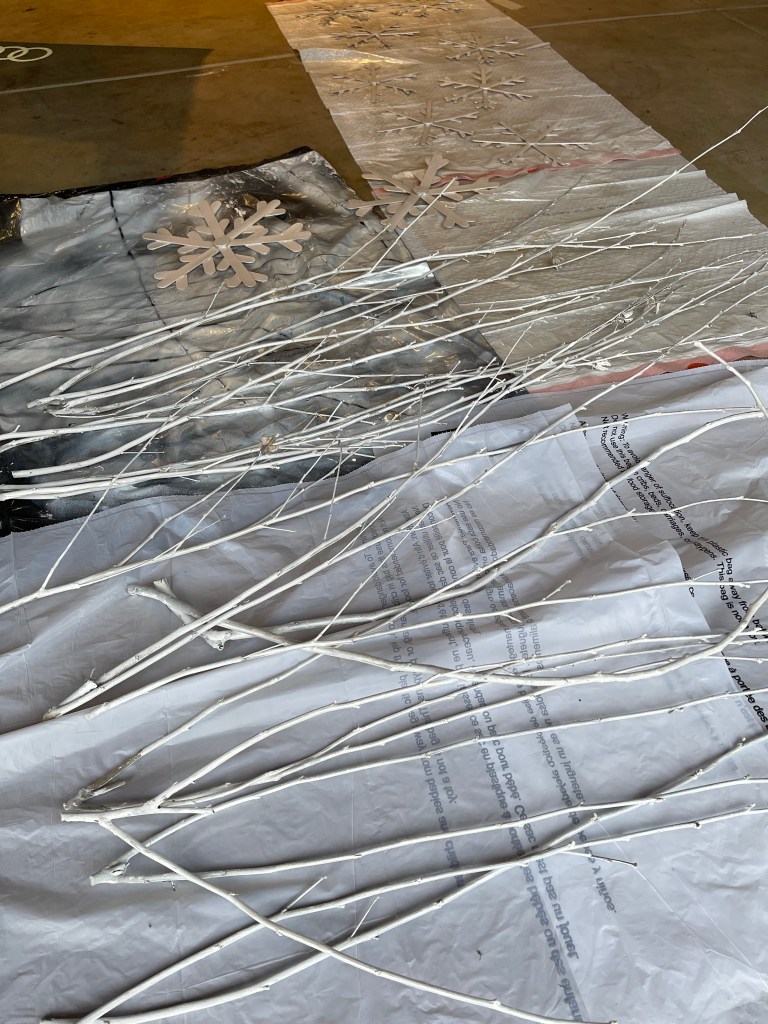
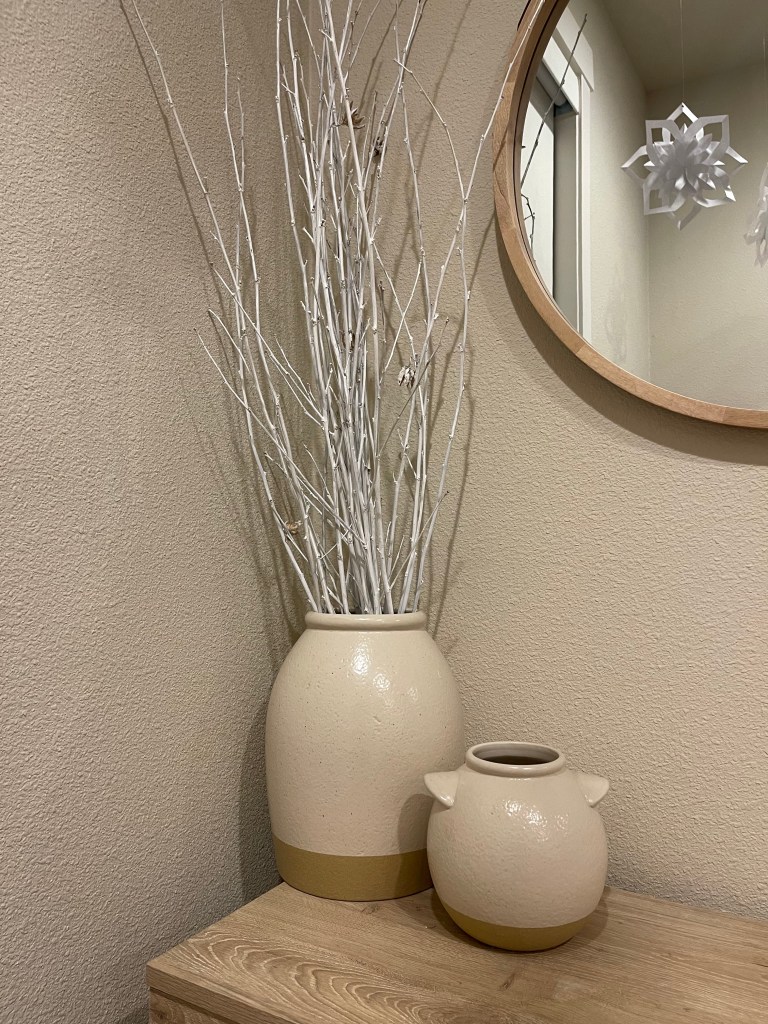
Another DIY project I did are these Winter branches. I followed this tutorial on Pinterest and used tree branches my dad cut from his property. The tutorial used white spray paint but I found that I used way too much spray paint, and it is not cheap!! I switched to regular white craft paint and brushes after using a can of white spray paint and it only covered one side of the branches. It was a little more time consuming but I think the final product came out better. I also like the look of them without the glitter/snow, so I left those off as well. They are now “Winter decor”!

I found lot’s of white/Winter theme decor at Dollar Tree, Hobby Lobby, Target and Micheals since it was around Christmas time. I did one last Hobby Lobby trip after Christmas for 70% off some of the extra items!

Cake Table

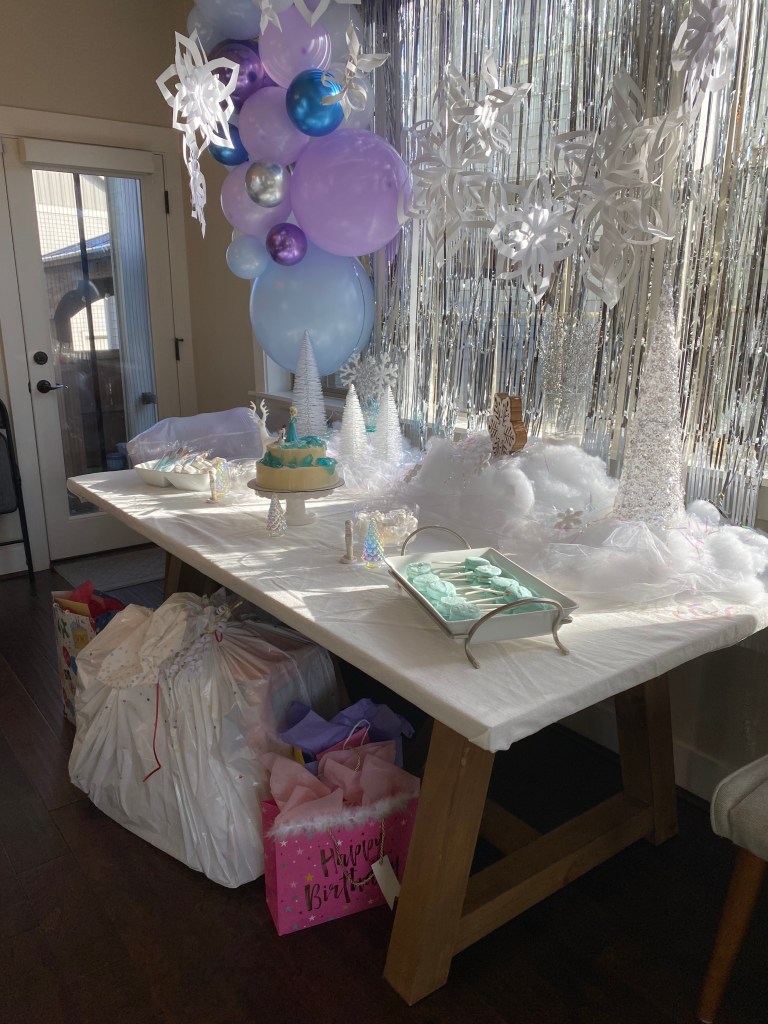
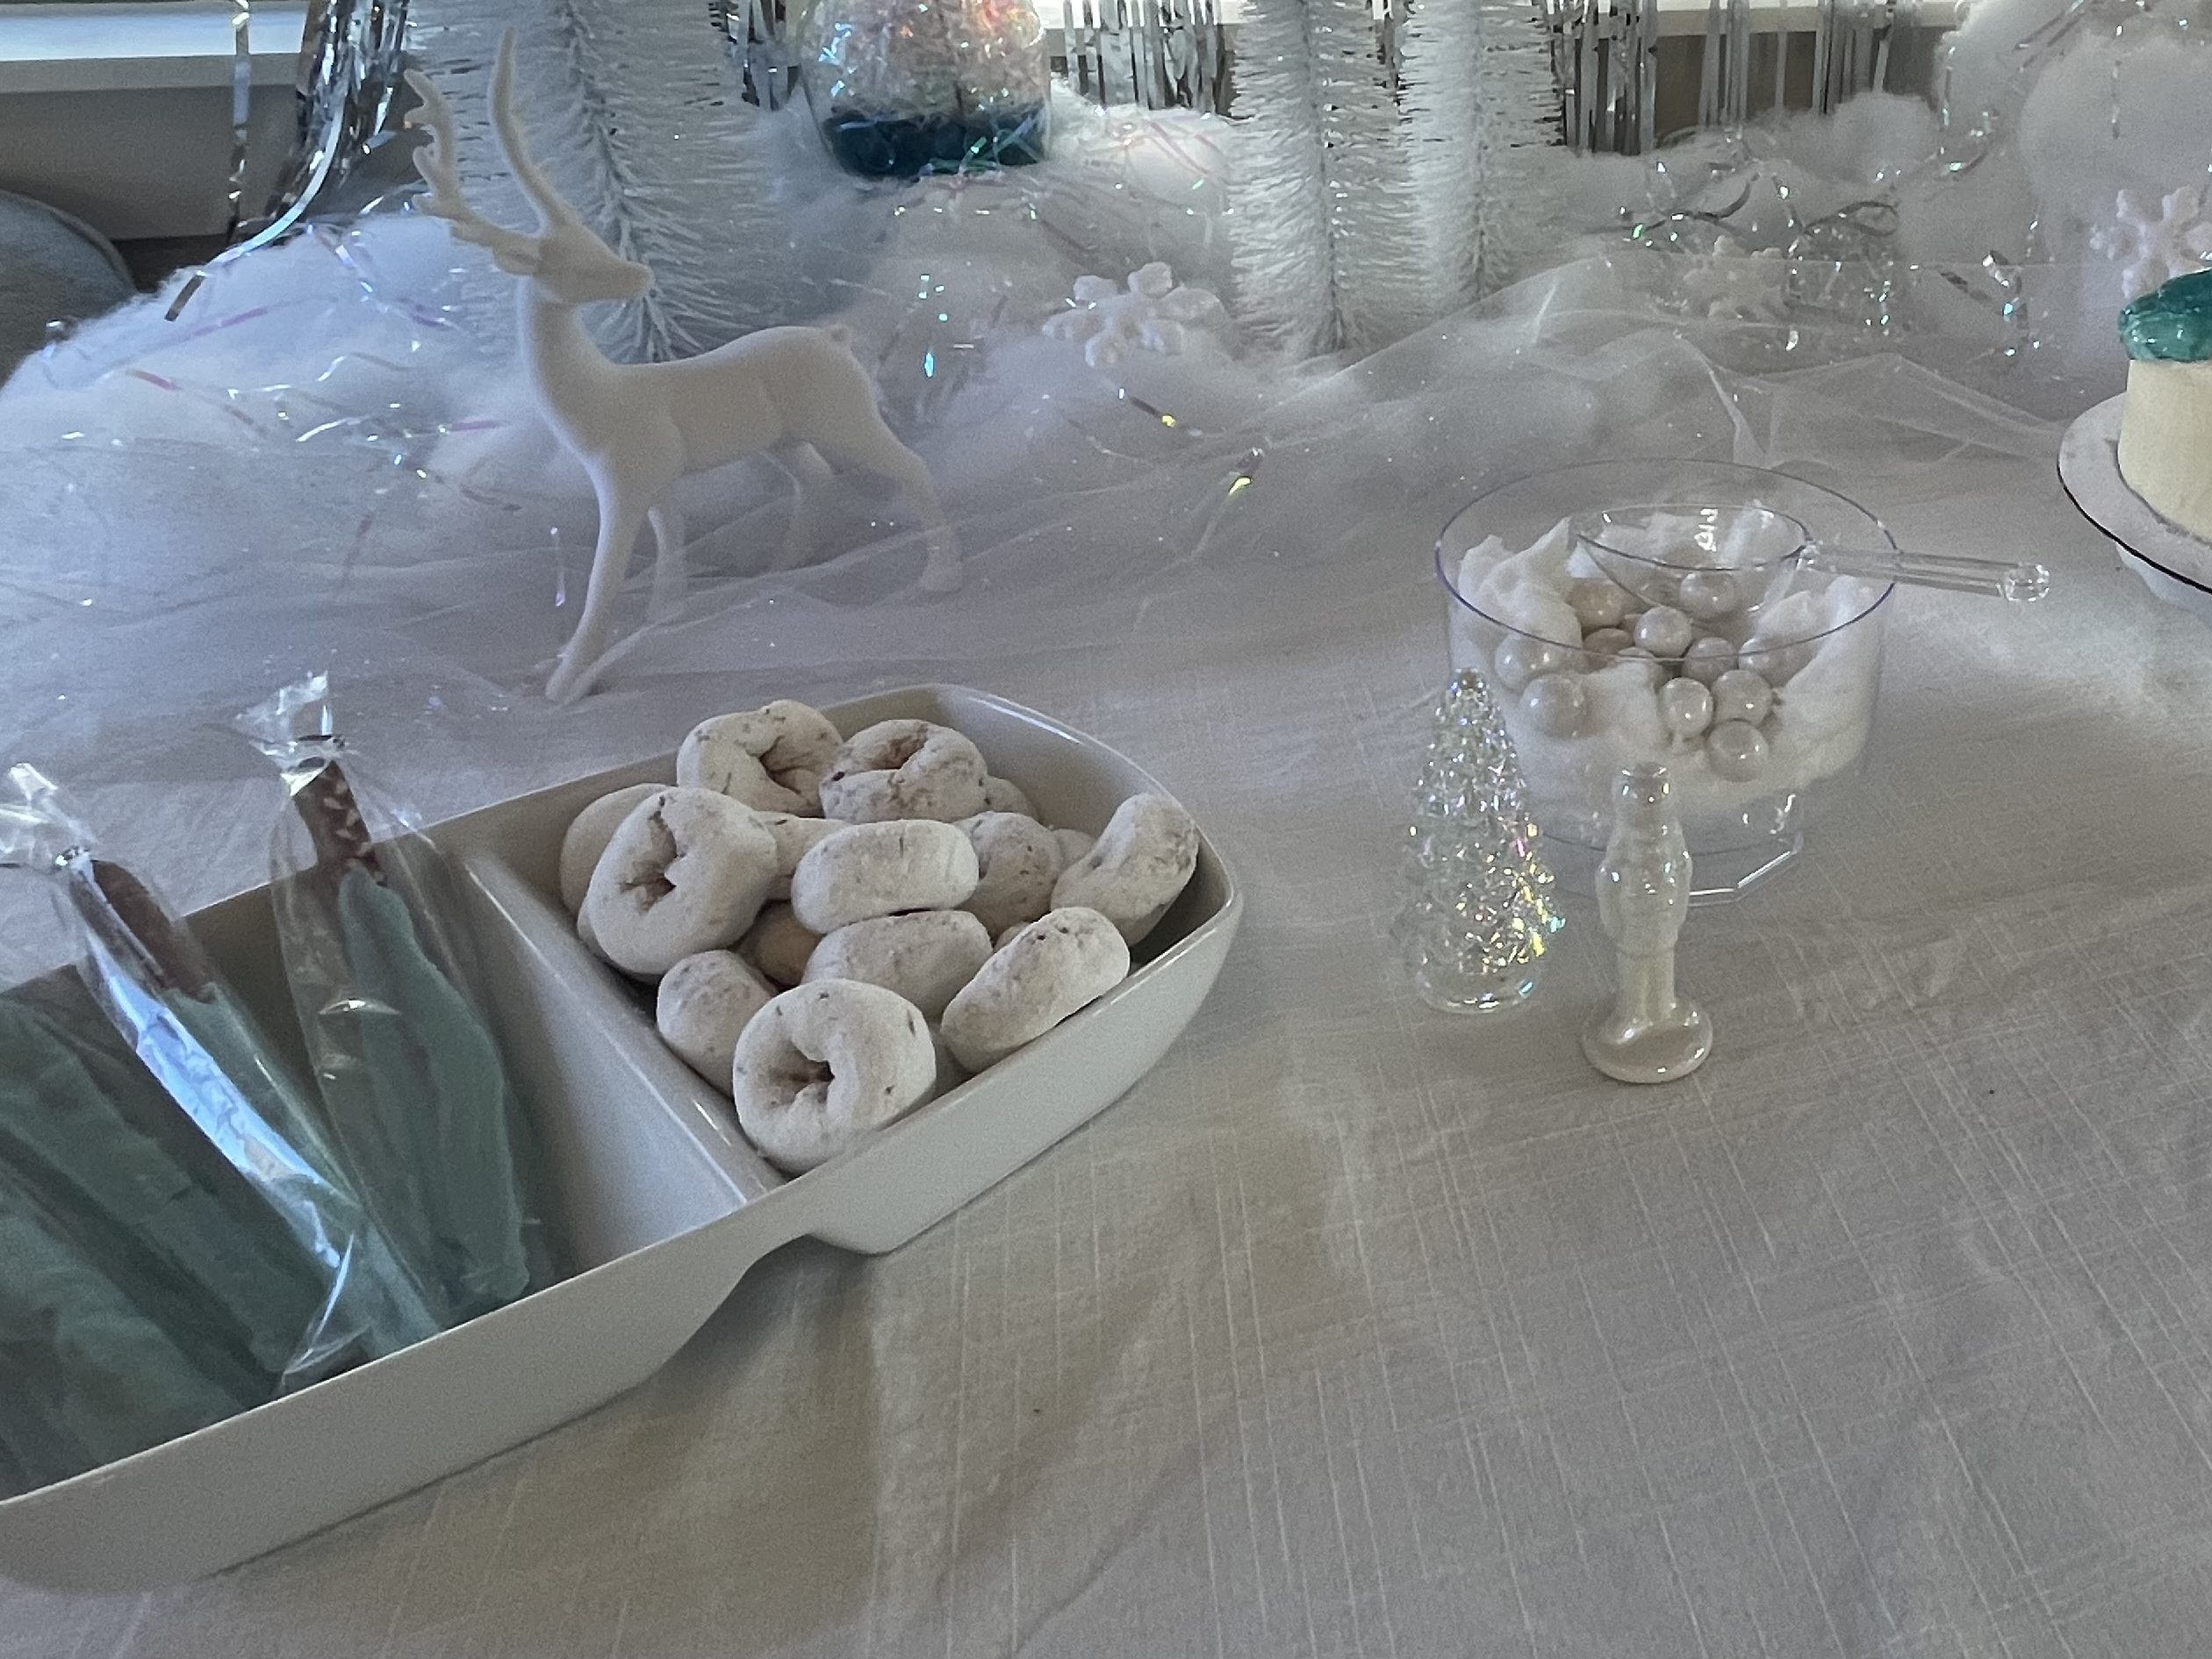
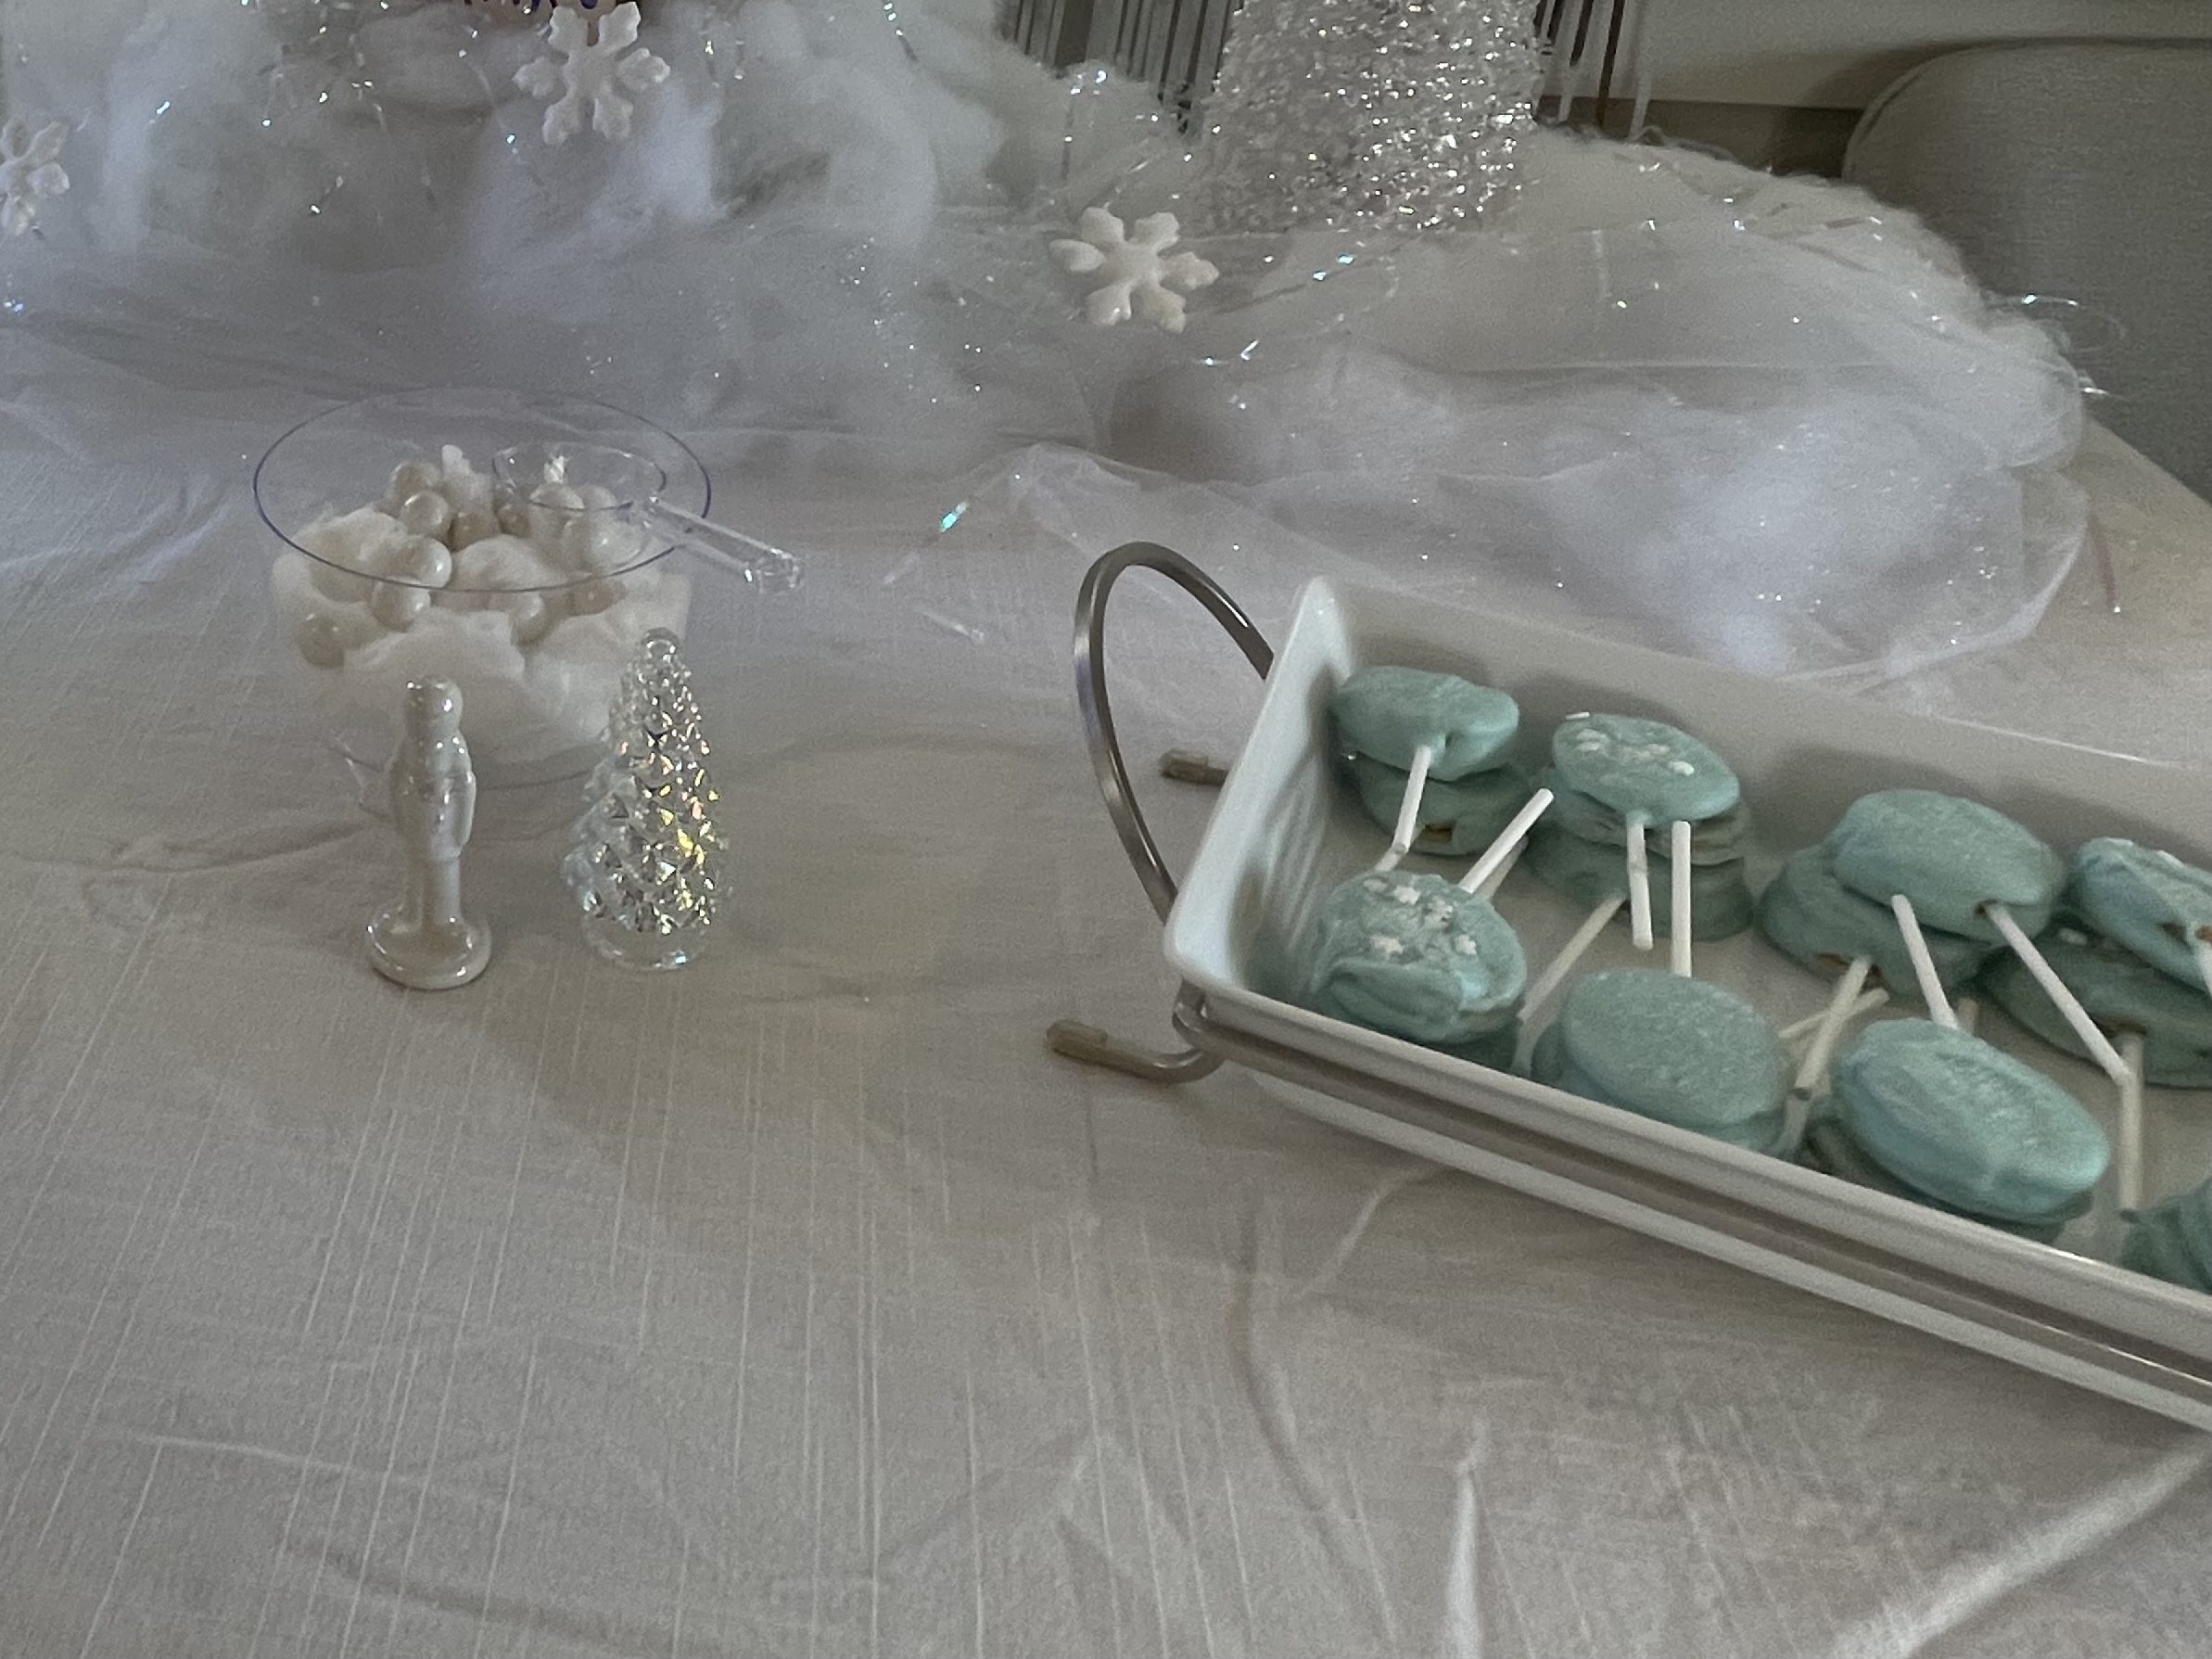
I made the balloon arch with this kit from Amazon, it’s time consuming to create your own arch but saves A LOT of money! I found the tinsel background from Amazon as well (this is 2 of them side by side). I have two old Ikea white curtains that I use for as tablecloths so I used one for the dessert table and I throw it in the washing machine after the party! I filled the table with white bottle brush trees, a white deer, and a bunch of white snowflakes I found in the craft department of Hobby Lobby. I kept the area around the desserts clear but I did add a few iridescent glass trees I placed around the base of the desserts but far enough away from little hands.

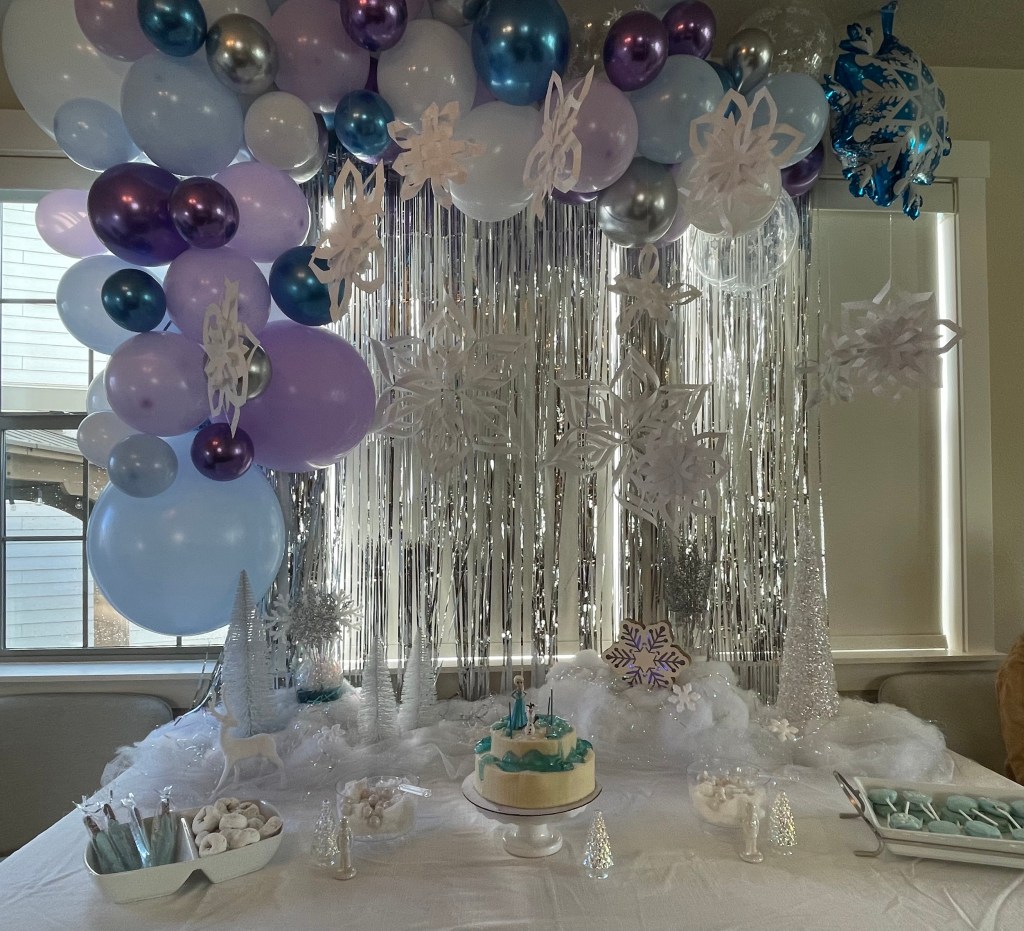
I decided to make and frost my own cake this year! I went easy with a boxed white cake but made my own buttercream frosting and I think it turned out amazing. The cake was moist and delicious but it was my first time layering and frosting a 2 tier cake so there were some spots with extra frosting. I also added blueberry jam between the layers and that was an experience to cover as well!

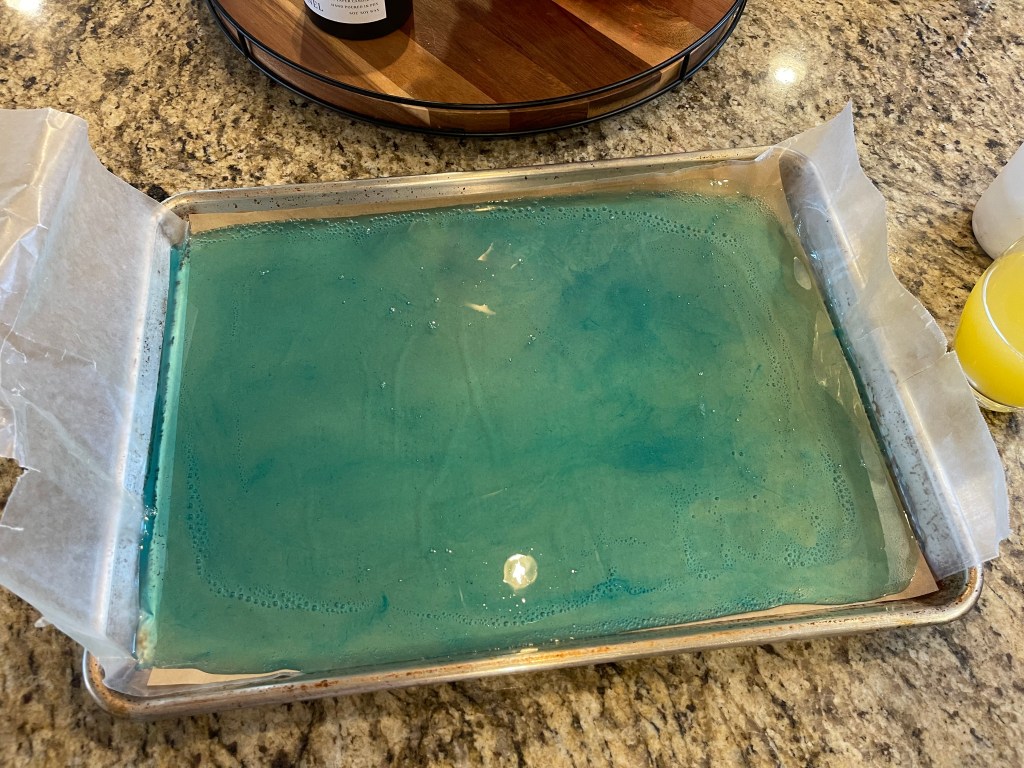
I also decided to try making Elsa’s “Ice” with boiled sugar and let it harden but, as you can see on the final cake, it didn’t work out too well. My original plan was to use melted white chocolate with blue food coloring but thought the sugar would look more “ice-like”. As you can see on the final cake, the “ice” melted as soon as it was taken out of the freezer. I had already put it on the cake before it started drooping and I would have had more of a mess if I started over so I just dealt with it. Thankfully, everyone loved the cake and had no idea the “ice” was supposed to be standing up.

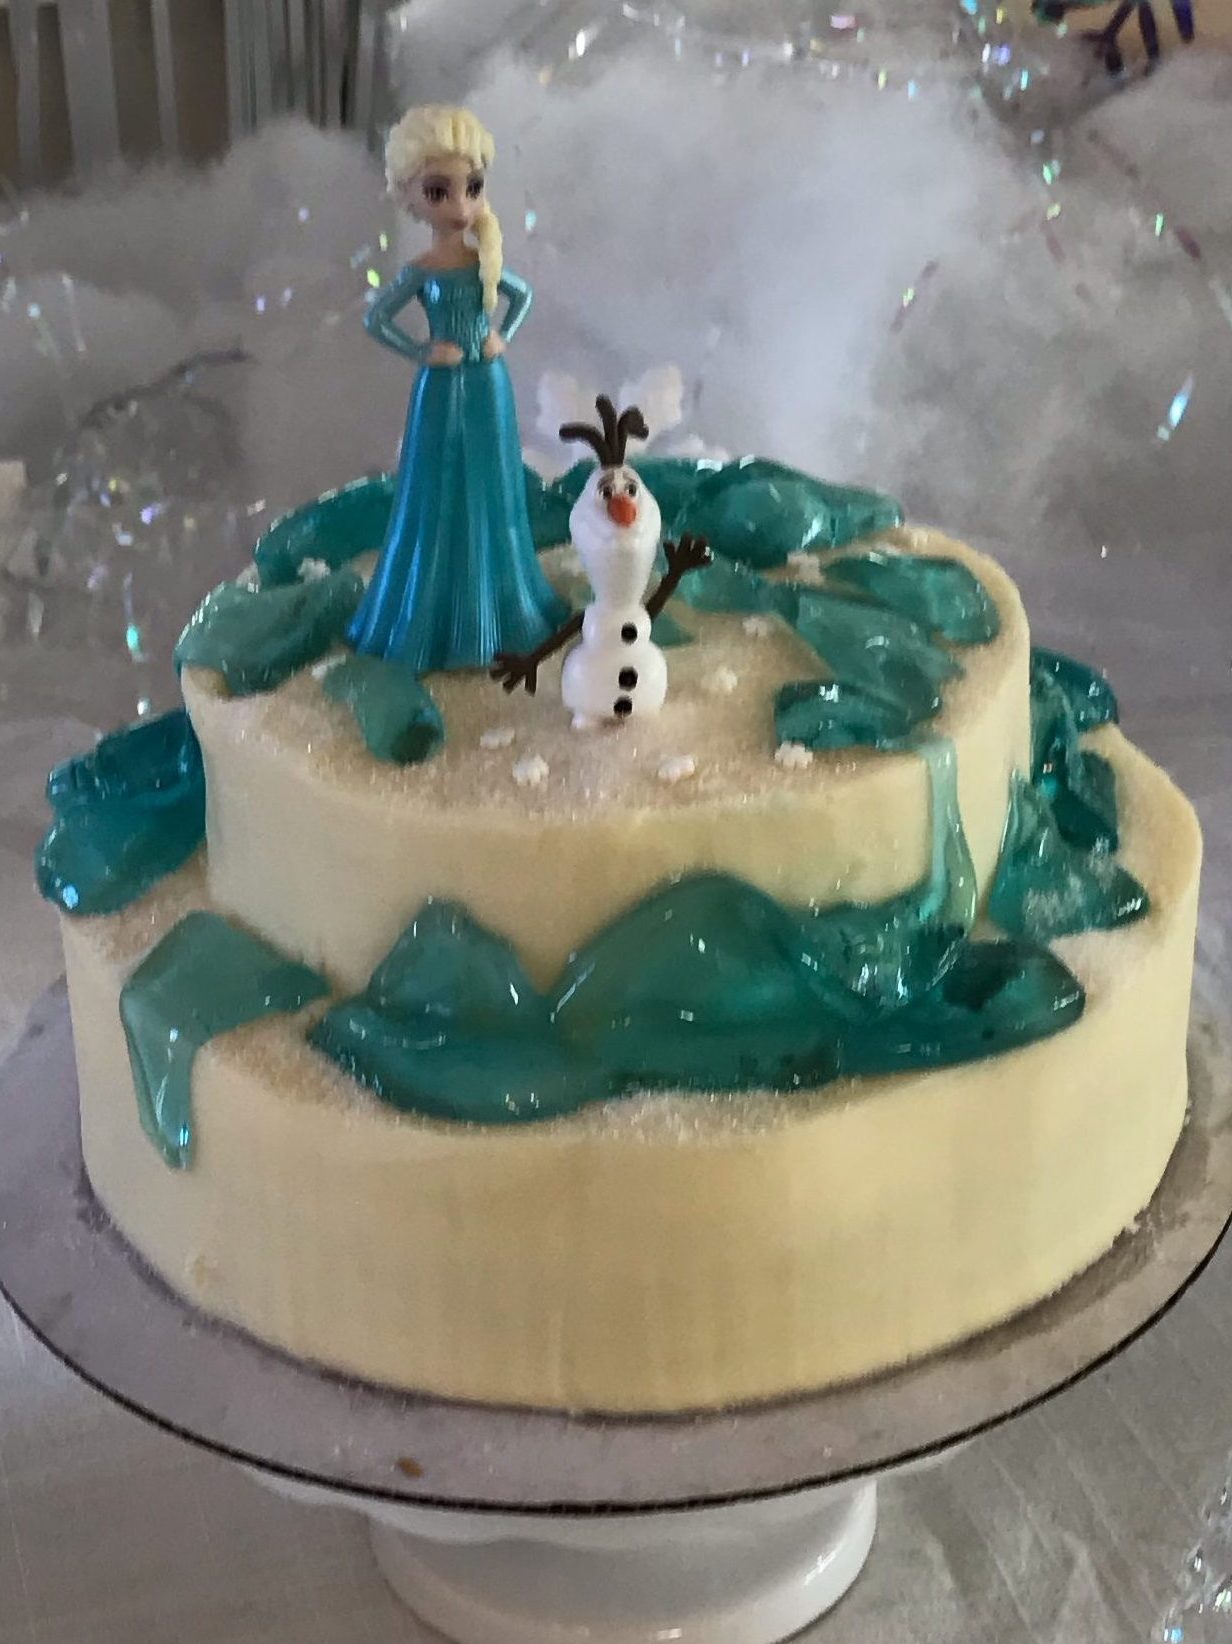
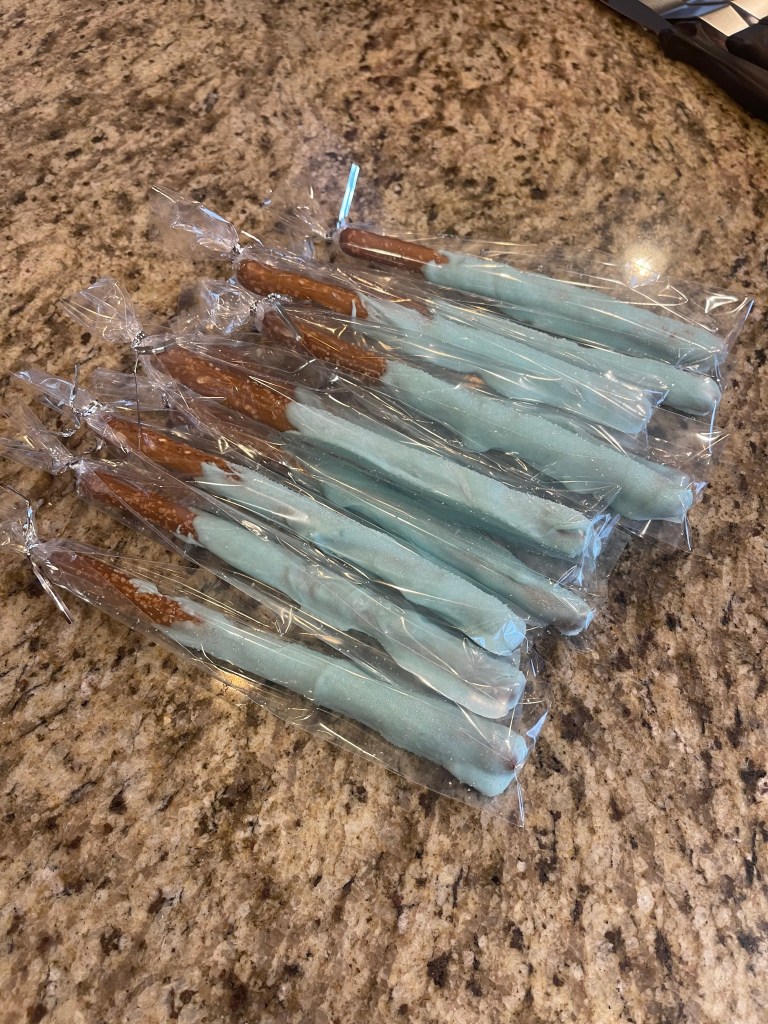
Along with the cake, we had Oreo pops, chocolate covered pretzels, powdered sugar donuts and white chocolate balls (I later found out they were gum balls, thanks Party City!!)

Food Counter

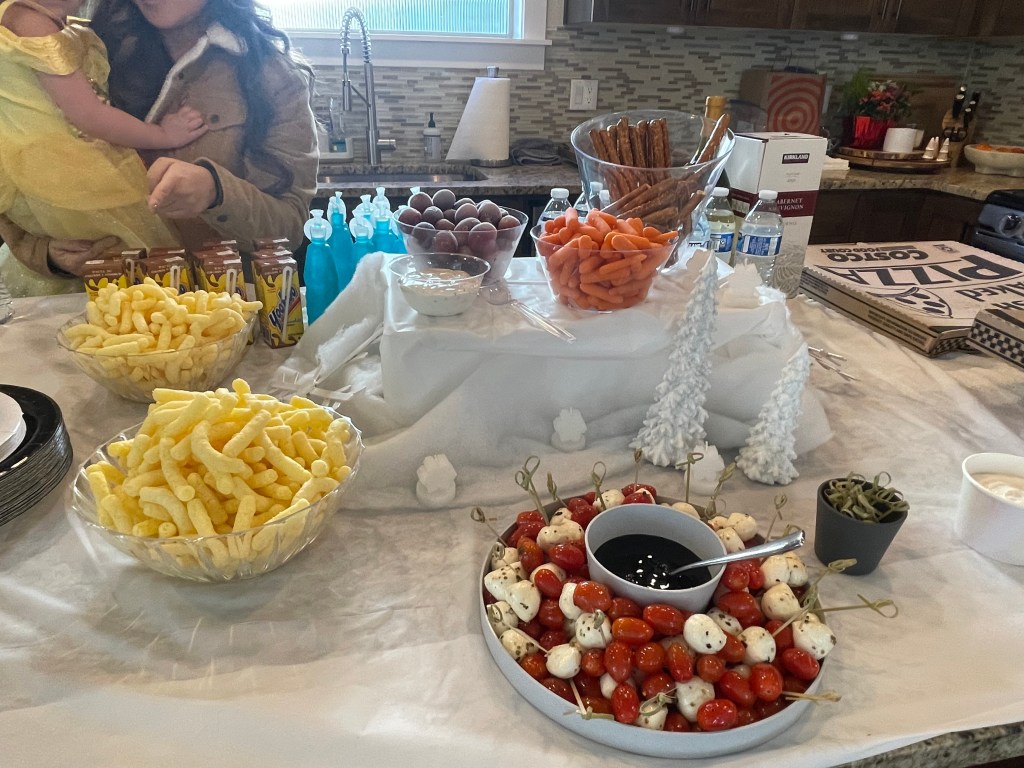
Since I wanted to focus on the decor and cake, I decided to keep the food items simple. I still stuck to the Frozen theme with mini carrots (Olaf Noses) and frozen grapes. We ordered 3 pizzas from Costco, and could have gotten away with 2 instead. I added the extra pretzel rods I didn’t use for favors and cheetoh puffs. I also made a quick caprese salad with balsamic glaze on the side (I didn’t realize until after the party that I forgot the basil!). We also had Yoohoo’s and blue kool-aid drinks for the kiddos.

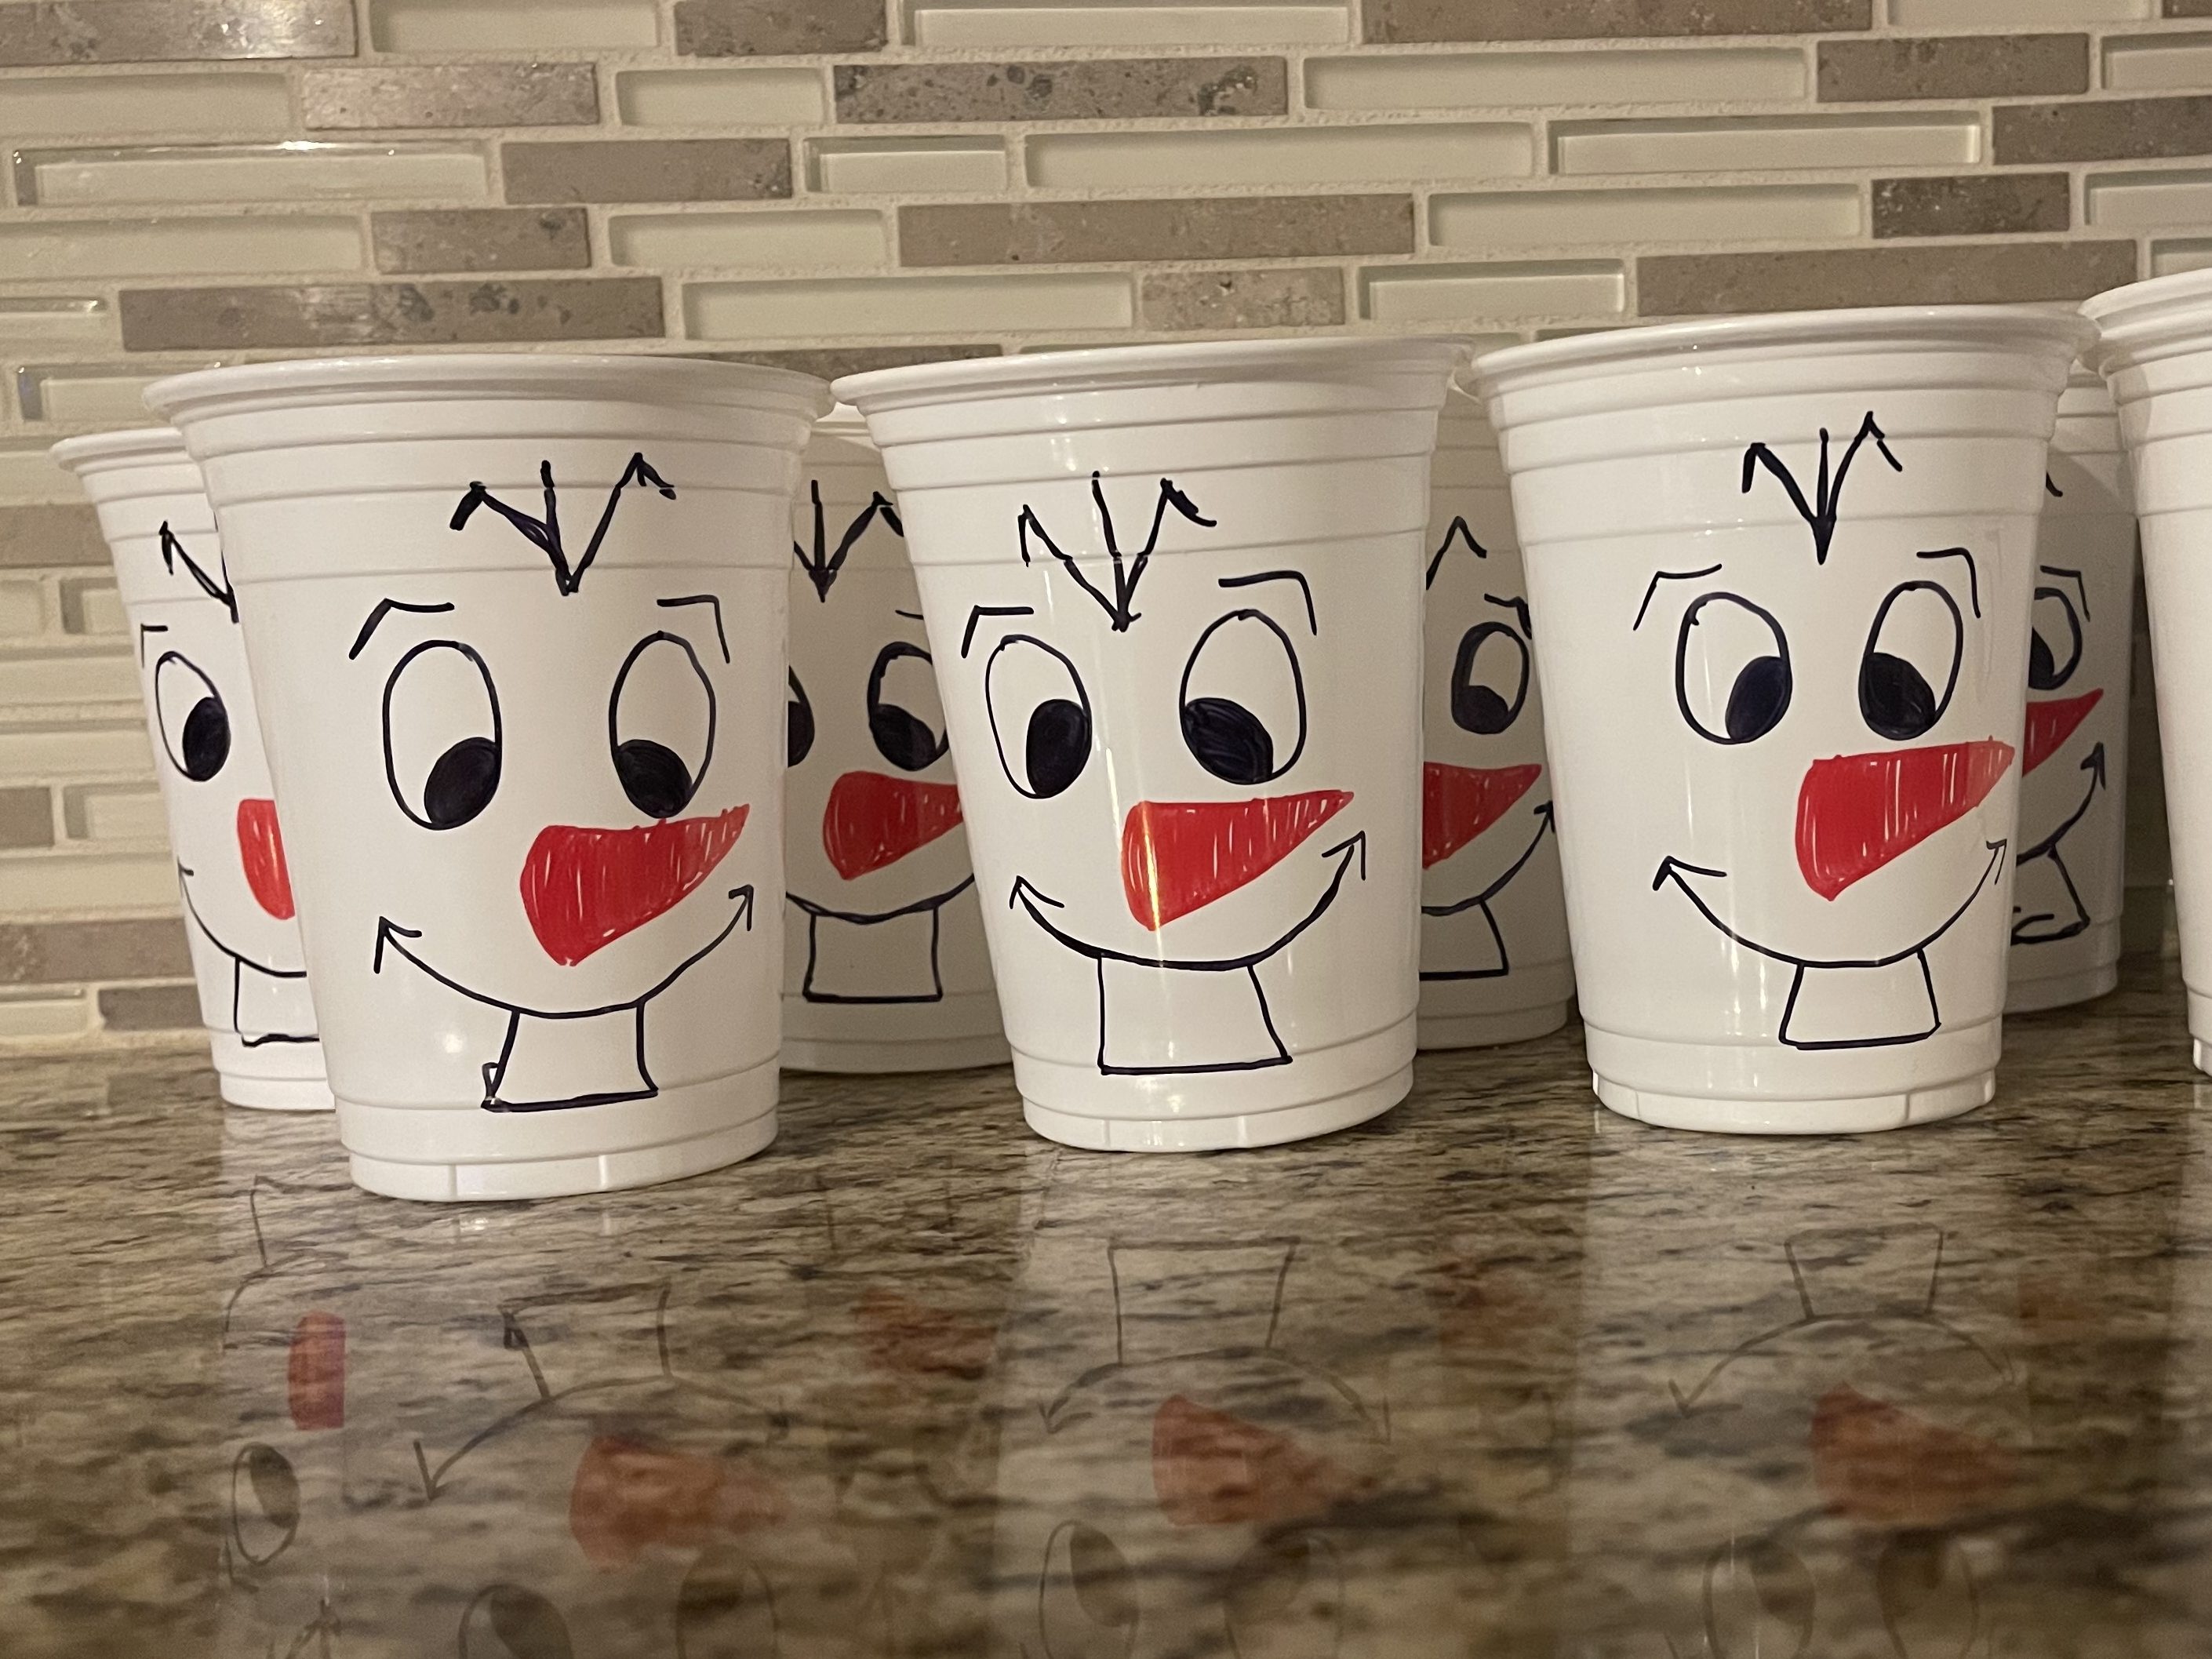
Check out these cute “Olaf” cups I made with white Solo cups and black and orange sharpies. I didn’t need them for the kiddos but the adults got to use them for our drinks 🙂

Kids Tables

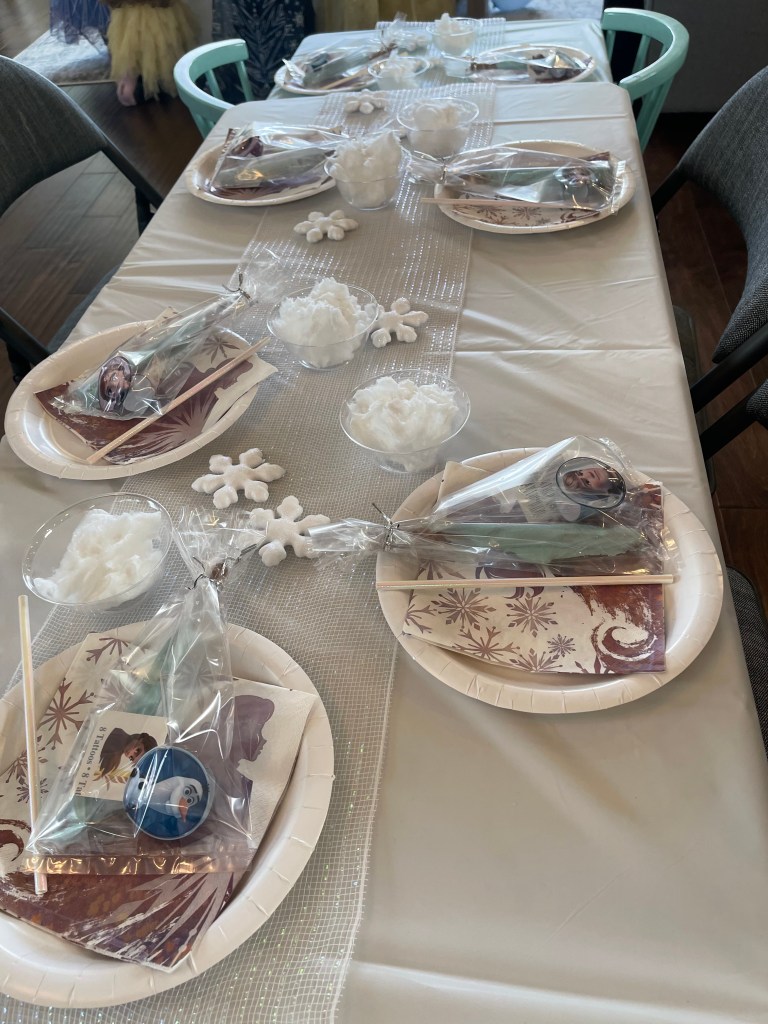
I used a fold up table with adjustable legs so it could be at the kids level for eating. I added a white tablecloth and taped it REALLY well to avoid spills. I added a tablerunner using a translucent, glitter roll and added some of the white snowflakes I found at the Dollar Tree. White plates with an Elsa napkin and glitter straws were placed in each spot as well.

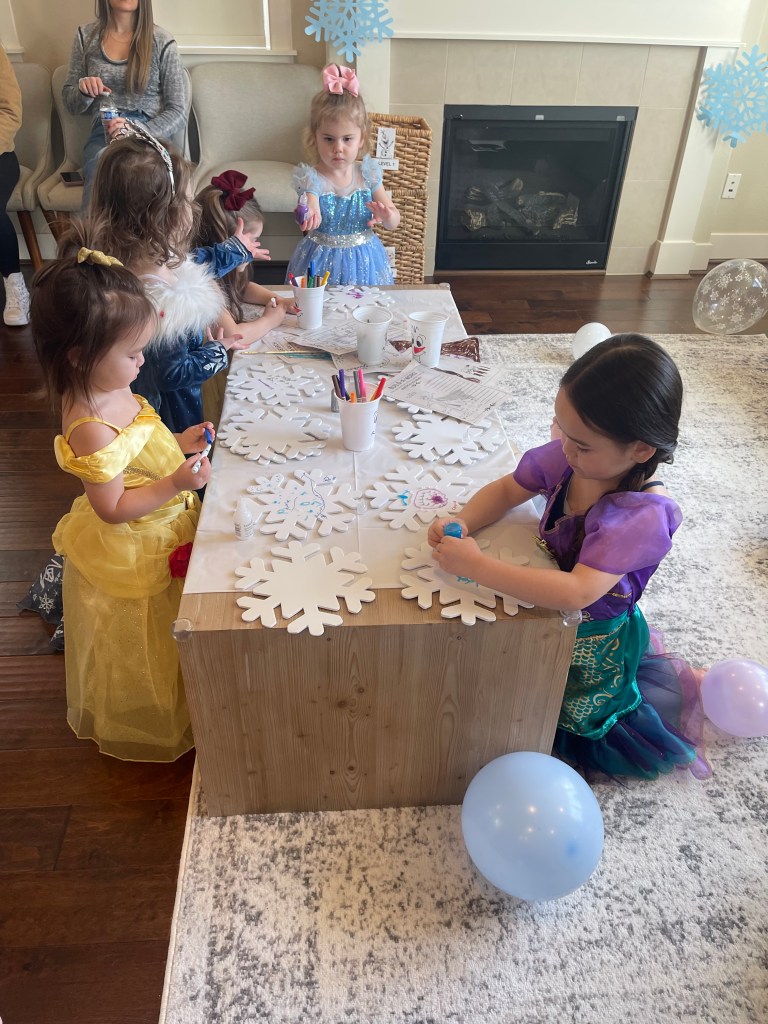
I decided to cover our coffee table and use it for “paint your own snowflake” activity. The girls loved using the glitter paints and pens to create their snowflakes and the activity kept them busy for awhile.

Activities

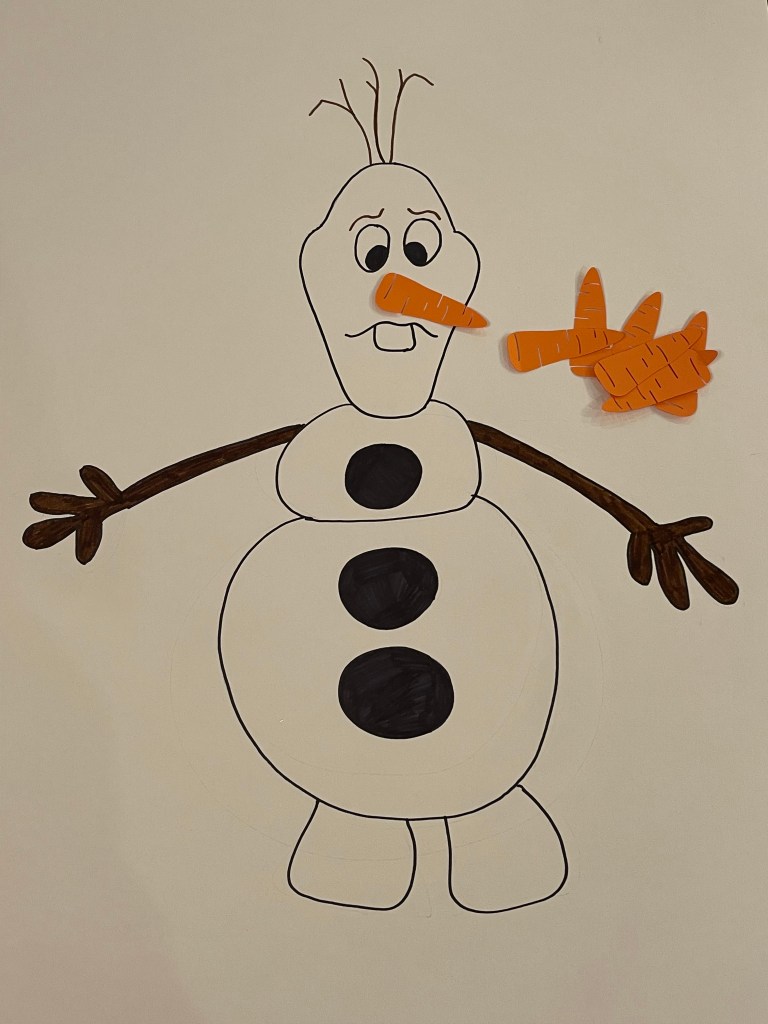
Besides the “create your own snowflakes”, I also created a Pin the Nose on Olaf and a snowball toss game. To round it all out, I decided to create a “Photo Booth” using a white tablecloth draped over our buffet cabinet.
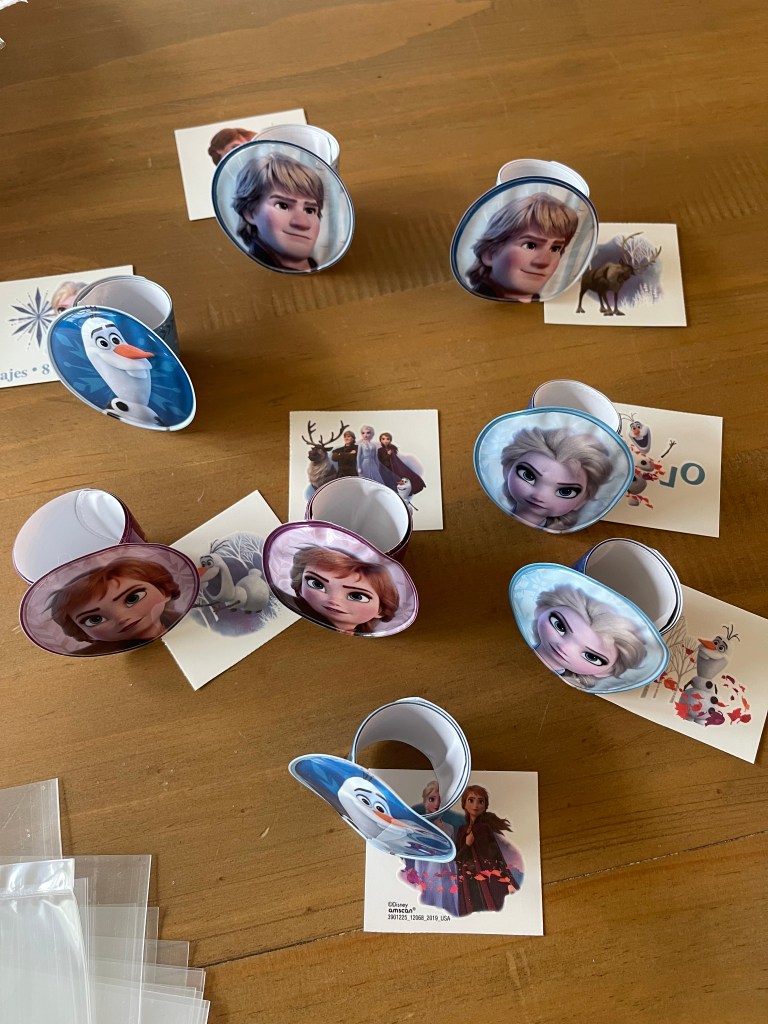
Favors

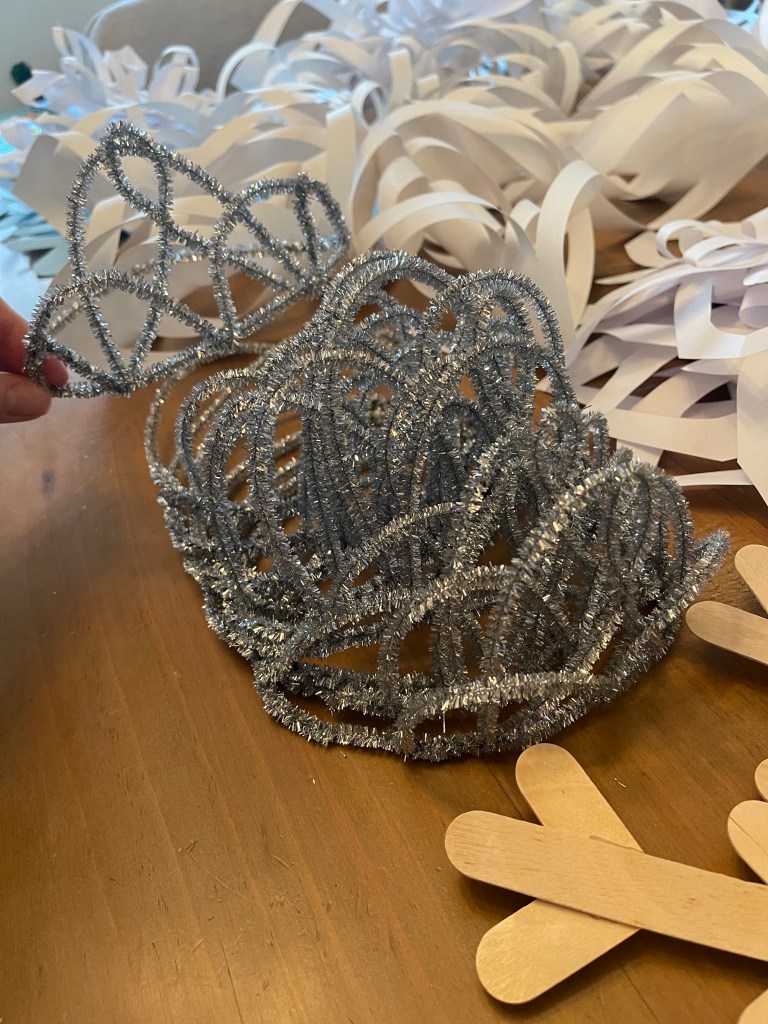
The girls each got a Frozen theme temporary tattoo and slap bracelet, along with chocolate covered pretzels. I made the pretzels with melted white chocolate chips and added blue food coloring before dipping 3/4th of the pretzel rod. I also had fun making mini crowns out of silver pipecleaners. The girls got to wear them for the party too.

My daughter had a blast at her Frozen birthday party. Let me know what you think of my ideas in the comments below.

Out of the Fog

Last week, my daughter and I stayed home while she was sick. Our weekday routine got disrupted, leading to reduced productivity and a constant feeling of being in a fog throughout the week. While being “in a fog” happens occasionally, it feels more disruptive as I grow my new business.

Despite my determination to improve each day, I struggled to change my perspective as the week progressed. I ended up sleeping longer, being less active, and letting housework pile up. While I made excuses for this so-called “laziness,” I knew deep down that they were merely excuses.

There are times when our brain and/or body needs a break but this became more than just a reset, I was really just making excuses to live in my fog. To try to get back on track, I did home workouts the last half of the week but didn’t follow them up with eating well or moving my body the rest of the day.

Finally, on Friday morning, I woke up with a renewed sense of motivation to get everything back on track. I learned that sometimes, you simply have to get up and start somewhere, anywhere, to reach your ultimate goals.

This week has already begun on a better note, and I’m excited to be back on track. If you ever find yourself needing a body or mind reset, take care of yourself, but don’t linger in the fog for longer than necessary, as I did. Get back into activities that will propel you towards your goals quickly.

Leave a comment

Restart, then Restart Again


Over the past 5 years, my health journey has taken me from being a dedicated runner to embracing strength training and becoming stronger. Although I still love running, it’s now more of an outlet than my main focus.

Of course, every new journey comes with challenges, and my gym journey has been no exception. From dealing with injuries to facing life events that impacted my body, my routine is in a constant state of evolution. What worked for me one week might not work the next. So, like in life, I’ve learned to be flexible and embrace change while still working towards my goals.

After surgery at the end of March, my body, and mind, were ready for a restart. Thanks to my training and routine, I felt prepared to handle the low points and get back on track toward my goals.

If you’re also feeling like you’re constantly restarting despite working hard towards your goals, remember that it’s okay to tweak your routine and keep going. Embrace the changes, learn from them, and you’ll emerge even stronger in the process.

Leave a comment

Jump Right In

Photo by Ksusha Semakina on Pexels.com

Sometimes in life, we just need to take the plunge to achieve the success we desire. To connect with the right people and open the right doors, we must engage in conversations and put ourselves in situations where those connections can happen. It doesn’t matter if we feel scared, out of place, or inexperienced; we need to put ourselves out there to learn and grow.

In my new career, I’m learning how to have conversations with people from all walks of life. The best way to practice is by getting out and talking to people. Sure, I may make mistakes along the way, but each experience teaches me something valuable. As a new real estate agent, hosting an Open House is an easy way to have those conversations.

A few weeks ago, I had the opportunity to host my first open house in a neighborhood I was familiar with, targeting first-time homebuyers. I prepared as much as I could with market stats, flyers, and even some safety items to calm my nerves. Then, I started talking to people. I learned a lot from each conversation and made notes to remember the important points. When another opportunity came up the next week, I didn’t hesitate to take it.

Of course, my conversations at the next open house weren’t perfect, and I didn’t expect them to be. But I learned even more from those interactions. By engaging in conversations, practicing scripts with other agents, and reviewing my notes, I’m developing the skills and confidence to have meaningful conversations that can lead to potential leads. I’m figuring out the right questions and phrases that help me gather important information from clients and do my job effectively.

So, the choice is yours: Will you jump right in and pursue your goals, or will you sit back and let others determine your success? The path to achievement lies in taking action and seizing opportunities for yourself.

Leave a comment

My journey into Real Estate

Big News!!!! I passed my Oregon real estate exam and I am officially a licensed real estate broker. I have been considering taking this leap for some time now and the time was finally right to start.

A little background. Before becoming a stay-at-home mom, I worked as an escrow assistant for five years. During this time, I gained valuable insights into the technical aspects of the real estate industry, which I believe will benefit me in my new career. Additionally, my experience in escrow allowed me to build a strong network of colleagues, clients, and friends. Before entering escrow, I worked at a regional bank and quickly moved up the ranks. Starting as an entry-level teller, I was promoted to personal banker within just six months. As a personal banker, I consistently achieved top sales in the region, leading to another promotion to customer service supervisor. This journey helped me gain confidence in my ability to learn quickly and communicate effectively with clients.

How to get a license. When I made the decision to obtain my real estate license, I reached out to several realtors for guidance on how to get started. I soon learned that there are a variety of ways to obtain a license. Some people choose to become unlicensed employees on a real estate team, learning the intricacies of the industry while also taking the online licensing course. They then take the exam before searching for the ideal brokerage to join.

In my case, I received a small discount on the course and began attending office meetings to absorb as much knowledge as possible while working through the coursework. I also contacted several other realtors for advice and guidance. Others opt to complete the course and exam before finding a brokerage to work with.

After determining your desired path, you must take the Pre-Licensing course for your state, which takes 150 hours in Oregon. I personally completed the course in four months while being a stay-at-home mom, but it’s possible to finish it sooner, say, three months. However, my studies were delayed for a few weeks due to a life event. Once you finish the course, you can schedule to take the National and State Exam but don’t feel disheartened if you don’t pass on your initial attempt as it’s normal to require a few tries. Fortunately, I passed on my first try and proceeded with fingerprinting and background checks. After completing those, you must find and confirm the brokerage you want to “hang your license” with. If you need help with your state’s real estate license requirements, visit your government’s website for pertinent information.

Benefits of becoming a real estate agent. As a real estate agent, you are an independent contractor, which means you have the freedom to create your own schedule and build your network according to your preferences. However, with this freedom comes the responsibility of managing your own taxes. In Oregon, independent contractors must set aside funds to pay both state and federal income taxes, as they receive their full commission without taxes being automatically deducted. It’s important to keep this in mind as you navigate your role as your own boss in the real estate industry.

As a homeowner, you don’t have to pay the listing side of the commission when selling your house. However, it is recommended to pay the commission to the buyer’s agent. If you are buying a house, you can be innovative with your commission and save a considerable amount of money. Additionally, you will have access to a vast network of additional contacts (lenders, insurance agents, etc) to choose from for your personal transactions, which can lead to even more savings.

Stay tuned for what’s to come. This is a new adventure for me and I am excited to create a long lasting career. I’ll be updating you guys on the next steps I take and share my experiences.

The Road Less Traveled

Last summer we took a road trip to Montana and had quite the experience traveling from Coeur d’Alene in Idaho to St. Regis in Montana. If you ever find yourself at a complete standstill on the highway (with a way out), this story may be one of caution, or, you might find yourself following our lead and taking the unknown path.

Blissfully unaware in Couer d’Alene

The day started when we left Spokane, Washington on our way to Montana to begin my sister and brother-in-laws wedding weekend. We had enough time before we had to be at the venue in Montana, so we spent the afternoon eating lunch and wandering around Coeur d’Alene, Idaho. After a few blissful hours with our daughter, we set off on I-90 for what should have been a quick hour and a half drive to St. Regis. Little did we know, we were setting off for one of the wildest experiences we have been through.

As we approached Osburn, ID (a small town near the state border), we received a call from my dad, who happened to be a few miles ahead, that traffic was at a stand still and we would want to find a way around. We jumped off the highway and travelled on a side road for as far as we thought we could go. We tried going up an on-ramp but sat for a few minutes with no movement before we decided to back off the ramp and keep trying side roads. We got as far as we could before our maps directed us back on the highway. So, again, we started up the ramp before being stopped by a line of cars that seemed endless. After a few more minutes with no movement, we decided to start checking Google Maps and Waze for any way around this mess.

Traffic Jam on I-90

I was trying to stay in contact with my dad, who happened to be a few miles behind us at that point with no way off the highway, and my sister, who was just ahead of us with no way to get off either, but the cell service was almost non existent. We had a hard enough time trying to get our maps to load to see what we could do. The only reason we were in a hurry and wanted to get around this mess was due to my sister needing our help to unpack the trailer and truck they had stocked up with wedding items from home. The plan was to be at the venue by 4 PM and it was only 1 PM at this point so we should have had plenty of time.


Our route from Idaho to Montana

Well, my husband found a way around but had to trick Google Maps because it didn’t give a direct route over the mountain. He found a lake that was on the Idaho-Montana border and another road that continued through to Montana so he added a destination to the lake and a second destination to the venue in Montana to get through. The mileage didn’t seem much further than what we already had to travel the direct route so we thought we would give it a go…

As we turned around on the ramp and headed to the side street maps suggested; 3 tow trucks, a couple police cars and a firetruck whizzed past on the opposite side of the highway. This was our sign that no one was moving for awhile on I-90.


Climbing up the Service Road

As we started down the backroad, we passed quite a few cars coming back the other way so we assumed they either didn’t want to continue on the route, or came from the other side. The “turned around” idea was confirmed when we saw kids on the side of the road waving to stop us and then a gentlemen on an ATV a little further down waving at us as well. We both said it was a little creepy and the views on the side of the road started giving us “Get Out” movie vibes with abandoned buildings and remote houses scattered. We both had an uneasy feeling but, for some reason, we decided to keep going to see where it would lead. We felt like we had nothing to loose since no one was going anywhere on I-90.


Somewhere, in the middle of nowhere

Just as we started up Forest Service Road 7623 I got a call through to my dad and let him know we were heading off the highway and would hopefully see them all soon on the other side, but then I lost service…for the next 2.5 hours!!

As we headed up the service road, we rarely saw other vehicles and, when we did, they were usually pulled over and the occupants were somewhere in the woods. The road slowly turned from paved, to gravel, to a narrow dirt road with lots of rocks and potholes to dodge. It was about 30 minutes into the dirt road that I started to get a little nervous about our trek and started wondering if we were about to be lost in the woods with no service. My husband and I confided in each other every 5-10 minutes that we were both nervous for what was ahead but we felt like we had already gone too far to turn back now. Not to mention, turning around was near impossible on the narrow road.

Civilization again?!

Our daughter had fallen asleep shortly after we left Coeur d’Alene and was still asleep while we bumped along at 5-10 mph for over an hour and continued to climb in elevation. As soon as we started descending on the other side, our daughter woke up and I was constantly looking out my passenger side window, down the mountainside and held on to the door with worry while my husband dodged back and forth, avoiding rocks and tree limbs sticking out in the road. We were already realizing at this point that the road was intended for off-road vehicles and were very glad we had our Subaru Ascent on this trip, it handled everything we threw at it.


Paved roads never looked so good

It was shortly after our daughter woke up that we came across a flag pole in the middle of trees with a State of Montana flag waving and we realized we had crossed the state line, over an hour after we had planned. My husband did a great job maneuvering down the mountain and as soon as the elevation evened out, we were rewarded with a beautiful view of blue skies and a clearing in the trees, and we both let out a sigh of relief that we made it this far. We traveled for about another hour on this less treacherous path before coming to a stop sign and a paved highway! We still didn’t have service but we knew we were getting closer to civilization and had made it through the nerve-racking part of our adventure.

As we started laughing about our experience and reviewing how we ended up making the decisions we did, I began to worry that my family was already through the traffic jam and wondering where we were. The last time I spoke to my dad, I lost service after I told him we were on some random service road and, that was nearly 2 hours before! We slowly started regaining service and by the time we made it to the first gas station we found, in Thompson Falls, I had enough service to get a call out.

She got us through it

I first tried my dad but, after he didn’t answer, I tried my sister and my brother, who was riding with her, with no luck either. I finally called my mom, who was traveling from Nevada to Montana and had a different route from us. She answered and let me know that none of them had made it to the venue yet and, last she heard, they were still stuck on I-90…in the same spot!! It was around this time that I also started getting text from my sister and she let me know they had not moved since we left, I felt relieved that no one was worried about us during that time. We just had a crazy adventure together and none of my family had any idea!

We made it to the venue an hour later and relaxed for another few hours before the rest of the family finally made it through. We found out that there was a fatal crash that shut down the highway and we just happened to be the lucky ones that didn’t get blocked in on the highway when it happened.

We made it to St. Regis!

On a side note, when we headed back a few days later, I was not surprised that the accident happened on this stretch of the interstate. The normally divided highway was under construction and they had all traffic on the East bound side with a single lane going each way. I was driving this stretch and it was not a relaxing drive through that portion of the highway with semi-trucks barreling past us at 65+ with no barrier.

This was a memory of our road trip that we will talk about for years to come. We had so many emotions during those 3 hours, but, at the end of it all, we were thankful we decided to go on this crazy adventure together.

You can read about the rest of our road trip here.


Leave a comment

A Day in Spokane

If you are planning to travel to Spokane, with kids in tow, you will be surprised by all the activities this city has for families. We spent 2 nights at an AirBNB while on a summer road trip and spent our one full day at Riverfront Park. Here are some of the fun places we explored in the park, as well as, some restaurants we tried out.

Accommodations-

There are a lot of hotels and short-term rentals to choose from in and around downtown Spokane so you have plenty of spots to choose from. We decided on a bungalow style 2 bedroom that we booked on AirBNB that was just outside of the downtown area. We enjoyed the distance from downtown so we could quickly get to all the locations we planned but it was far enough out to be quiet and secluded. Spokane is the home of Gonzaga University so they cater to the student body and have plenty of accommodations throughout the city for visitors.

Riverfront Park-

We spent a few hours exploring Riverfront Park, a 100-acre urban park in the heart of the city with a ton of attractions. We parked on the North side of the park and ran around the colorful Hooptown basketball courts and watched kids run around the Ice Age Playground. Our daughter wasn’t up for running around the playground but it looked like a ton of fun, complete with a splash pad.

Hooptown Basketball Courts
The Great Northern Clocktower

We headed across the bridge and enjoyed views of the Spokane Falls before checking out the Looff Carousel and the Big Red Wagon (it’s a slide!). Just wandering around the park is magical, there’s so much to see and do.

Big Red Wagon Slide
Looff Carousel

Where to Eat-

Our first stop when we arrived in Spokane, was lunch at Franks Diner on 2nd Avenue. This cute little diner is in an old train car and our daughter absolutely loved that we could eat in a train! If you’re lucky, like we were, a train will travel by on the railroad tracks that are adjacent to the diner. The food was typical diner food and we got breakfast items, because breakfast at any time of day is the best!

Anthony’s Restaurant at Spokane Falls is a little on the fancy side for kids but we took our daughter because we heard great things, and there’s a great view of the Spokane Falls. We did feel it was a little overpriced for the food and drinks but it was our one splurge on the trip. The place was packed on the night we visited and they did a good job of accommodating our daughter. My dad and stepmom joined us for this particular dinner and we enjoyed the atmosphere.

Just down the road from our rental we found a burger place called Wisconsinburger. We decided to try it out for a late lunch and it was delicious. It’s off the beaten path in the middle of a residential area and it was really peaceful sitting outside. We had to try the cheese curds and we don’t have anything to compare them to, never having tried them, but they tasted good.

For lunch during one of our outings, we stopped in at Wiley’s downtown bistro. We found it while wandering into the downtown area from Riverfront Park, it’s just a couple blocks in. The atmosphere at lunch was casual but it looks like it could get a little more fancy, but intimate, for dinnertime. We enjoyed a few drinks and shared a wrap with pasta salad while out daughter fell asleep in my lap! It was a quiet walk back to the car!


We had a fun filled two nights in Spokane and found lot’s of kid friendly activities and dining options. You can check out our whole road trip plans on my post here.

Leave a comment

Weekend in Wenatchee

We spent 4 days in Wenatchee, Washington last July and found some fun activities to keep us busy while we were in town for a wedding.

As for Wenatchee, we didn’t really know what to expect in this little town but with a little research, we found a lot to keep us busy. We did have a few wedding related events to attend throughout the weekend but we still had plenty of time to explore the heart of Chelan County.

Accommodations-

We stayed at Springhill Suites Wenatchee in a 2 queen bed room. The hotel is central to most of the city and easy to find as it is right off Wenatchee Avenue. We were very impressed with the room and the hotel in general. Our room was very spacious with 2 queen beds, a separate toilet room with sink, another “shower room” with sink, and a seating area that included a desk, large couch and mini fridge. We had multiple people come to our room to visit and had plenty of space to accommodate them all.

We also took advantage of the free continental breakfast, gym and indoor pool. The day we visited the pool, we were the only people for over an hour! Our daughter loved splashing around and they have a waterfall type feature that was a lot of fun for her to watch.

The beds were very comfy for all 3 of us and our favorite part was the A/C! It was very hot at the end of July and we were thankful for the cool room to retreat to. We had a family member staying at another hotel without A/C and she was thankful to be able to come over and hangout in our room occasionally as well.

Things to Do-

Our favorite place to head to each day was the Riverfront Park and Pybus Public Market. The riverfront was peaceful just for walking around and finding a shaded spot for picnics. We often parked at the Market, grabbed some food and headed down to sit in the grass. Look at those views!

The Pybus Public Market is an open, airy marketplace featuring local farm goods, artisanal foods, restaurants and specialty shops. The sign at the front of the parking area gives off Pike Place Market vibes and we never had issues finding parking when we got there. Over the weekend, they had some fun activities and a small farmers market just outside of the marketplace.

The wedding was held at the Highlander golf course. The guys got to play 18 the day before the wedding and it sounds like it is a great course. The views are worth the long and windy trip up to the golf course. The wedding was beautiful with that gorgeous view behind the bride and groom!

The unique town that is Leavenworth, WA (the go to place for Christmas vacations) is only a 30 minute drive from Wenatchee. We didn’t get a chance this trip but, if you have the time, making a trip to Leavenworth, any time of year, would be worth it.

Places to Eat-

The Wild Huckleberry is a great place for brunch. We sat outside and had huge portions for the price. They had some fun flavors of mimosas, as well, that they would add flavored vodka to for some extra oomph. It does get super busy on the weekend so I recommend getting there early if you are in a hurry.

Atlas Fare is a fine dining restaurant in the downtown area. The food and drinks were delicious and they were very accommodating with the three kids we had (2 of which were toddlers). This would be a great place for a formal dinner.

Little Red’s Espresso & Bakery is a cute little coffee trailer outside of the Pybus Public Market. The trailer may be small but the menu is quite large. They offer lots of different flavored coffee and espresso drinks, smoothies, breakfast burritos, paninis and sweet treats. Once you grab your treats, you can walk down to the waterfront to enjoy it with a view.

The Huck @ Pybus is a great spot for brunch or an afternoon happy hour. It has an eclectic vibe with breakfast, lunch and dinner. We decided to try it out for our last brunch in town and it was great food and great service. Our server informed us there is another location in town as well.

You can read about our road trip tips and adventure at Traveling with Toddler -Road Trip Edition.

One response to “Weekend in Wenatchee”

  1. […] flying to your destination. For destination ideas and activities, you can check out my posts for Wenatchee, Washington and Spokane, Washington, as well as, our “off-the-beaten path” […]

    Like

Leave a comment

Traveling with Toddler- Roadtrip Edition

We decided to take a roadtrip in the Summer of 2022 to attend weddings in Washington and Montana. Our daughter was 2 1/2 at the time and we learned a lot of what worked (and didn’t) while we planned and completed the trip. Road trips are a great way to experience new places on your own timeline, especially with kids in tow. Hopefully, our experience can give you some tips for your next family roadtrip.


Planning-

Once we booked our accommodations, I created an itinerary with all the location details so we could have it in one place while we travelled.

Packing-

Along with the above itinerary, I created packing and meal lists. I kept copies of the lists, along with the hotel/rental confirmations, in a file folder so we were prepared each day.


Staying Organized-

We had a specific plan for packing the car and we stuck to it throughout the trip to ensure everything stayed in its place.

Bathroom with a view

In the back of the car, we folded down the 3rd row so we had the maximum trunk space (Subaru Ascent). Our luggage went in on one side so we still had quick access to it when needed. On the other half, we kept our collapsible tote, a small cooler and our daughters potty (this is the one). We filled the tote with car essentials that we might need including; a few towels, extra baby wipes, first aid kit, roll of toilet paper (you never know), etc. *See “in the car” packing list above.

Add on a roof box, we have a Thule box that we can easily attach for extra storage. We stored golf clubs and the Pack ‘n Play with room to spare.

Within arms reach– We had our in car activities and snacks. Also, I found these storage trays at Target that our daughter could use to contain her food and activities in the car.


In Car Activities-

  • Magic marker pens and paper: Mess free coloring!
  • A few small books
  • Play dough stored in a small ziplock bag with a handful of popsicle sticks and small toy animals.
  • Soft Travel Busy Board- This toddler busy board folds up and is perfect for travel. Our daughter loves playing with it.
  • Surprise Bags! 10 numbered small paper bags that I packed with small toys and a small treat. My plan was to give our daughter one a day on the trip but, after she got her first bag, she wanted more!! I would let her open and play with the contents of a bag and then refill it before giving her the next one so I had an endless supply of “surprise bags” to hand her.
  • Tablet with games and movies downloaded and headphones.

Road trips are a great way to experience new places with kids and, for many, it is less stressful than dealing with flying to your destination. For destination ideas and activities, you can check out my posts for Wenatchee, Washington and Spokane, Washington, as well as, our “off-the-beaten path” adventure.


Leave a comment

How to Create a Calendar Wall

If your family tends not to be prepared for events at the beginning of the month, I highly recommend you implement a 2 month calendar system! This post is all about how I implemented a 2 month calendar system for our family and the benefits we experienced from it.

I love being organized but I started to miss events at the beginning of each month while using our families single calendar system. Even when I realized an event was in a few days, I was not prepared with a gift, outfit, babysitting, etc. The wall I had our family calendar on was tall enough to make a command center on but I knew our family wouldn’t utilize the whole thing with our current lifestyle. We just needed a spot to quickly check our daily, weekly and monthly activities without all the extra fluff.

Prior calendar system- On the first day of each month, I would take down the calendar, erase the previous month and add the new dates and events for the current month. This system quickly became a problem when I realized there was an event coming up in a few days and I had totally forgotten about it since it wasn’t “on the calendar” I checked daily.

Small Change for Big Rewards-

NEW 2 month calendar system-I decided the easiest way to combat this would be to add another calendar to the wall so we would have 2 months up at all times. This simple solution has become a huge success for our family to keep on top of all our events.

Look how nice it is to see two months ahead!


How to implement 2 calendar wall-

Update Current Month- Now at the beginning of each month, I take down the current month and update any new events that may have come up since I last month. Then, I swap the current month calendar for the previous month on the top hooks.


Switch out Previous Month to Upcoming Month-When I take down the previous month, I erase the whole thing before starting fresh. I then add the actual dates before including all the events for the upcoming month. I replace it on the bottom hooks on the calendar wall, below the current month.


Add Some Creative Touches

I love the creative touches to the calendar to the right. If you are creative and artsy, this would be a lot of fun to make. Add some small touches to the individual events or something that represents the current month. I actually do this on occasion, but it depends on what kind of items I can actually draw! 🙂

Enjoy the process and get creative with your family’s schedule!

I now always know what is coming up for a 2 month span and love feeling in control of our schedule again. This seems like a simple solution but since I lived without it for years, I assume there are others out there that are struggling with their own systems. Here’s to your family being prepared for each and every event you have coming up now that you have a simple solution to stay organized.

Let me know what you think of the 2 calendar system or how your family stays organized in the comments section.

Leave a comment